I was halfway through a week of takeout, staring at the empty pizza box on my kitchen counter when my phone buzzed with a text from my roommate: “You have to try this ramen hack I found.” I laughed, rolled my eyes, and answered, “Only if it’s better than that instant soup.” A few minutes later, the aroma of sautéed garlic and ginger hit my nose, and the kitchen felt like a small, sizzling theater. The sound of oil splattering was the opening act, the steam rising like a curtain, and my stomach began to drum a hopeful rhythm. I’d always been a ramen enthusiast, but nothing had prepared me for the depth of flavor that would unfold in that single pot.
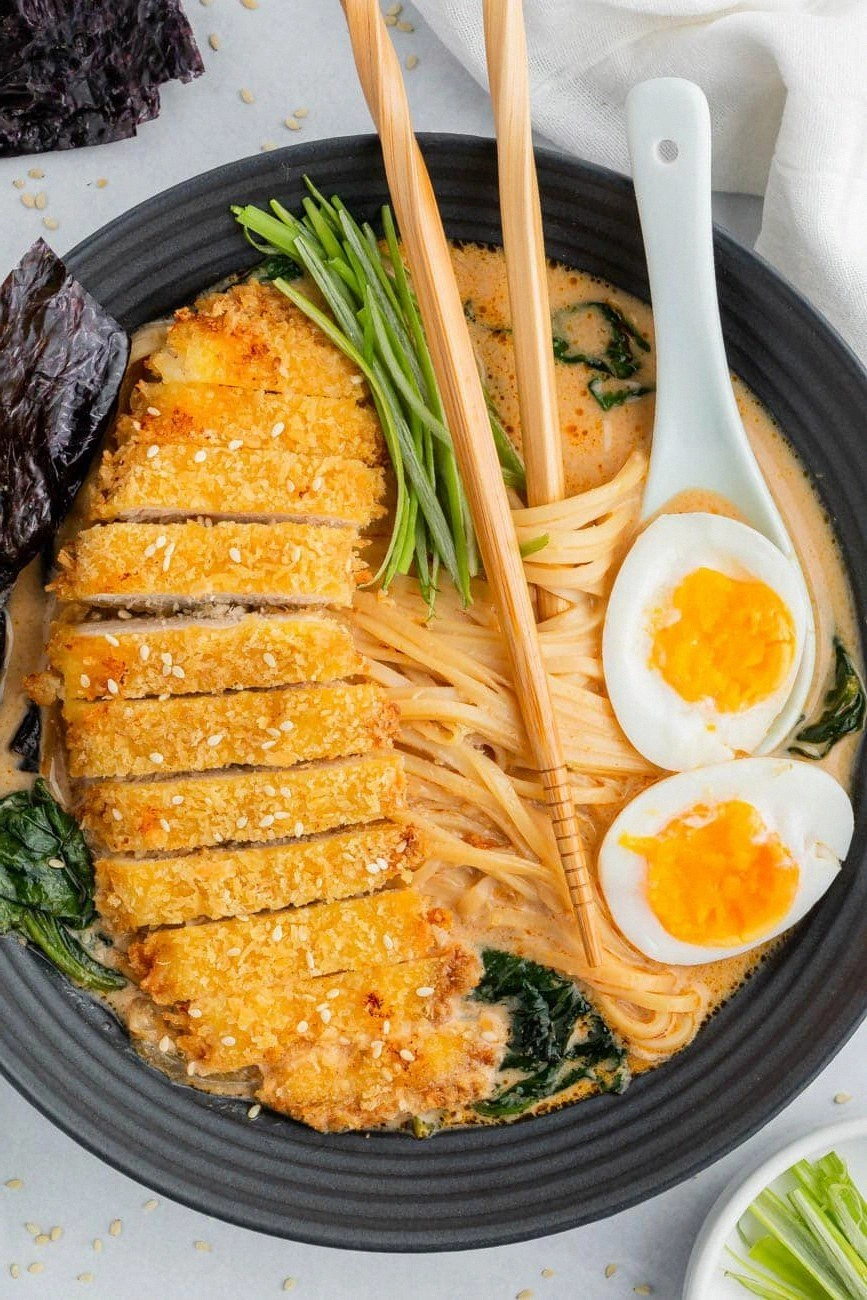
Picture this: a thick, silky broth that clings to every noodle strand, a golden, crunchy katsu that snaps like thin ice, and a soft-boiled egg that releases a molten yolk that swirls like a lazy river. The sight of the bright green spinach leaves, the glossy nori sheets, and the speckled sesame seeds feels like a palette of colors that promise both comfort and adventure. The scent of coconut milk mingling with miso and chili paste is a warm hug that lingers long after the last spoonful. My senses were in full concert, and I could almost taste the tangy kick of chili and the subtle sweetness of the coconut. I was already convinced this would be the most memorable bowl of ramen I’d ever make.
But what truly sets this version apart is the unexpected twist of a crispy chicken katsu that doubles as both protein and texture hero. It’s not just the crunchy exterior; it’s the way the panko coating absorbs the broth, creating a subtle, nutty undertone that elevates every bite. The combination of miso, soy sauce, and chili paste gives the soup a layered richness that feels like a well‑written novel—each ingredient playing its own role, yet all harmonizing. And let’s not forget the delicate balance of salt and sesame, which bring the dish together like a choir of flavors. I dare you to taste this and not go back for seconds; it’s that addictive.
If you’ve ever stared at a ramen box and felt the urge to elevate it, this recipe is your answer. The secret is in the broth’s depth, the katsu’s crispness, and the final flourish of fresh greens and eggs. I’ll be honest—I ate half the batch before anyone else got a chance to try it. Most recipes get this completely wrong, focusing on the noodles alone and neglecting the protein and broth. This is hands down the best version you'll ever make at home. Picture yourself pulling this out of the pot, the whole kitchen smelling incredible, and knowing you’ve just crafted a bowl that feels like a hug from a friend. Let me walk you through every single step—by the end, you'll wonder how you ever made it any other way.
What Makes This Version Stand Out
- Flavor Depth: The broth is a symphony of miso, soy, and coconut, layered with chili paste for a subtle heat that lingers without overpowering.
- Texture Contrast: The katsu’s golden panko crust offers a satisfying crunch that contrasts beautifully with the silky noodles and tender chicken.
- Ingredient Quality: Using fresh, high‑grade chicken breasts and real coconut milk ensures a richer, more authentic taste than instant mixes.
- Time Efficiency: The method keeps prep time under 20 minutes while still delivering a gourmet experience—perfect for busy nights.
- Make‑Ahead Potential: The broth can be prepared a day in advance, allowing the flavors to meld, and the katsu can be baked or fried ahead of time.
- Crowd Appeal: Even the most skeptical ramen skeptics will be converted by the crispy texture and the umami‑rich broth.
Alright, let's break down exactly what goes into this masterpiece...
Inside the Ingredient List
The Flavor Base
Olive Oil (1 tbsp): This is the first canvas that brings everything together. It’s the first thing that hits the pan, creating a golden sizzle that signals the start of flavor. If you skip it, the aromatics will feel flat and the broth will lack that subtle, nutty undertone that makes the dish feel elevated. For a richer taste, choose a high‑smoke‑point olive oil or a blend with a hint of pepper.
Onion (2 oz): Finely diced, it releases sweetness and depth as it browns. Onion is the backbone of any broth; without it, the soup would taste one‑dimensional. If you’re short on time, a small amount of onion powder can substitute, but the fresh texture is irreplaceable.
Garlic (½ tbsp): Minced garlic gives the broth a sharp, aromatic punch. It cuts through the richness of coconut milk and adds a warm, comforting note. Over‑cooking garlic can turn it bitter, so keep the heat moderate.
Ginger (½ tbsp): Fresh ginger adds a bright, zesty kick that lifts the broth’s heaviness. It also brings a subtle heat that complements the chili paste. If you prefer a milder flavor, reduce the ginger to a quarter tablespoon.
Water (8 cups): The base of the broth, it dilutes the flavors just enough to create a soup that’s hearty but not cloying. Using filtered water ensures the broth isn’t tainted by chlorine or other impurities.
The Umami Boosters
Chicken Bouillon (2 tbsps): This concentrated stock adds savory depth. It’s the secret to a broth that feels like it was simmered for hours. If you’re gluten‑free, look for a low‑sodium, gluten‑free bouillon.
Chili Paste (2 tsps): A small amount of chili paste gives the broth a subtle, lingering heat that doesn’t overwhelm. It also adds a touch of color, making the soup visually appealing. Adjust to taste; more paste for a spicier bowl.
White Miso Paste (2 tbsps): Miso brings umami richness and a slight sweetness that balances the coconut. It also thickens the broth slightly, giving it a velvety texture. If you prefer a darker flavor, swap for red miso but reduce the quantity to avoid overpowering the dish.
Soy Sauce (2 tbsps): A classic umami enhancer, soy sauce deepens the broth’s complexity. It also adds a hint of saltiness that elevates all the other flavors. Opt for a low‑sodium version if you’re watching your sodium intake.
The Protein & Texture Crew
Chicken Breasts (2): Lean, tender chicken that will become the star of the katsu. The breasts need to be pounded thin for even cooking and to ensure the panko coating adheres properly. If you’re vegan, replace with tofu or tempeh.
Panko (1.5 cups): The secret to that unforgettable crunch. Panko’s airy texture creates a light, crispy coating that doesn’t become soggy in the broth. If you’re looking for a gluten‑free option, use rice panko.
Large Egg (1): Used for the egg wash that binds the panko to the chicken. The egg’s protein structure helps the coating stick, resulting in a crispier finish. A beaten egg with a dash of water works just as well.
Olive Oil Spray: A light mist of olive oil on the chicken before frying ensures a non‑stick surface and a golden finish. It also adds a subtle fruity note that complements the broth.
The Final Flourish
Spinach Leaves (2 cups): Fresh spinach adds a burst of color and a slight earthiness that balances the richness. It wilts quickly, so add it near the end to preserve its vibrant green hue.
Soft‑Boiled Eggs (4): The yolk’s silky texture contrasts beautifully with the crunchy katsu. The eggs also add a subtle protein boost and a touch of luxury to the bowl.
Green Onion Strips: A finishing garnish that adds a fresh, oniony brightness. The green parts provide a pop of color and a mild crunch.
Nori Sheets (2): These seaweed sheets bring a savory, briny note that cuts through the coconut’s sweetness. They also add a pleasing chewiness when torn into bite‑sized pieces.
Sesame Seeds (1 tbsp): Toasted sesame seeds add a nutty aroma and a subtle crunch that elevates the overall texture profile. They also lend a warm, earthy undertone.
Salt (1.5 tbsp): Salt is the final seasoning touch that ties all flavors together. It’s important to measure carefully; too much salt can drown the delicate balance of the broth.
Coconut Milk (7 oz): This creamy element adds a silky mouthfeel and a tropical sweetness that balances the umami and heat. Use full‑fat coconut milk for maximum richness.
Instant Ramen Noodles (8 oz): The noodles are the base of the bowl, soaking up the broth and providing a chewy texture. For a healthier option, choose whole‑wheat or buckwheat noodles.
All Purpose Flour (½ cup): Used in the batter for the chicken, it helps create a smooth coating that holds the panko together. If you’re gluten‑free, substitute with chickpea or almond flour.
Everything's prepped? Good. Let's get into the real action...
The Method — Step by Step
- Prep the Broth: In a large pot, heat 1 tbsp olive oil over medium heat. Add the diced onion and cook until translucent, about 3 minutes. Stir in minced garlic and ginger, letting the aroma bloom for 30 seconds. Pour in 8 cups of water, add chicken bouillon, chili paste, miso paste, and soy sauce. Bring to a gentle simmer, then reduce the heat to low and let it infuse for 15 minutes, allowing the flavors to marry. This step sets the foundation for the entire bowl.
- Make the Chicken Katsu: While the broth simmers, pat the chicken breasts dry and pound them to an even thickness of about 1/2 inch. Season each side with 1.5 tbsp salt and a pinch of pepper. Beat the large egg in a shallow dish; dip each chicken piece, then dredge in ½ cup flour, followed by 1.5 cups panko. For an extra crisp, lightly spray the coated chicken with olive oil spray. Heat a skillet over medium‑high heat and fry the chicken until golden on both sides, about 4 minutes per side. Let the katsu rest on a paper towel to drain excess oil.
- Cook the Noodles: In a separate pot, bring water to a rolling boil. Add the instant ramen noodles and cook for 2 minutes, then drain. Rinse under cold water to stop the cooking process and keep the noodles from becoming mushy. Set aside; these noodles will soak up the broth later.
- Finish the Broth: Add the coconut milk to the simmering broth, stirring until fully incorporated. Taste and adjust seasoning, adding more salt or soy sauce if needed. Let it simmer for another 5 minutes to meld the coconut sweetness with the umami base.
- Assemble the Bowl: Place a handful of noodles in a deep bowl. Pour the hot broth over the noodles, allowing them to rehydrate and absorb the flavors. Top with a generous slice of the fried katsu, ensuring the crispy edges are visible.
- Add the Toppings: Arrange 4 soft‑boiled eggs, halved, on top of the katsu. Sprinkle the fresh spinach leaves, green onion strips, and nori sheets across the surface. Drizzle a thin line of sesame oil if desired, and sprinkle toasted sesame seeds for that nutty finish.
- Final Touches: Give the bowl a quick stir to distribute the flavors evenly. The broth should be steaming, the noodles tender, and the katsu still crisp. This is the moment of truth; the bowl should look like a masterpiece.
- Serve Immediately: Present the bowl with a ladle of hot broth on the side for extra sips. The combination of textures—crunchy, silky, tender—creates a satisfying symphony in every bite. Enjoy the warmth, the aroma, and the burst of flavors that dance on your palate.
That's it — you did it. But hold on, I've got a few more tricks that'll take this to another level...
Insider Tricks for Flawless Results
The Temperature Rule Nobody Follows
Many cooks assume that a lower simmer will always produce a better broth, but the secret is maintaining a gentle, steady heat. A consistent low temperature allows the miso and coconut to meld without scorching the sugars. If the broth boils too vigorously, the coconut can separate, resulting in a gritty mouthfeel. Keep the pot just below a rolling boil, and use a thermometer to stay within the 195°F to 205°F range.
Why Your Nose Knows Best
The aroma of your broth is the ultimate quality indicator. When the miso and chili paste hit the heat, the scent should resemble warm, toasted bread with a subtle citrus note. If it smells flat or metallic, it’s a sign that the broth hasn’t infused properly. Trust your nose; it’s the most reliable guide to flavor development.
The 5-Minute Rest That Changes Everything
After frying the katsu, let it rest on a rack for five minutes before slicing. This brief pause allows the juices to redistribute, preventing the chicken from drying out. The result is a moist interior with a perfectly crisp exterior. Skipping this step often leads to a soggy, disappointing katsu.
Use a Food Processor for Panko
If you’re short on time, pulse the panko in a food processor for a few seconds to create an even texture. This ensures each bite is uniformly crunchy. The uniformity also helps the coating adhere better during frying, reducing the chance of clumps falling off.
Keep the Broth Warm Until Serving
Reheating the broth can cause it to thicken and lose its silky texture. Keep the broth warm by placing the pot on a low‑heat burner or using a bain‑marie. If you must refrigerate, reheat over low heat and add a splash of water to restore its original consistency.
Creative Twists and Variations
This recipe is a playground. Here are some of my favorite ways to switch things up:
Spicy Kimchi Katsu
Swap the chili paste for a generous spoonful of kimchi puree, and add a handful of kimchi to the broth. The fermented tang adds a bold, complex flavor that pairs wonderfully with the coconut. The result is a ramen that feels both familiar and adventurous.
Vegan Tofu Katsu
Replace the chicken with firm tofu, pressing it to remove excess moisture. Coat in panko and fry until golden. This version is lighter yet still delivers the satisfying crunch. Pair with a vegetable broth for a plant‑based delight.
Sweet Potato Ramen
Add thinly sliced sweet potato to the broth during the simmering stage. The natural sweetness balances the miso and chili, creating a comforting, autumnal bowl. Top with roasted pumpkin seeds for an added crunch.
Seafood Surprise
Swap the chicken for shrimp or scallops, lightly seasoned and sautéed. The seafood’s delicate flavor complements the coconut broth, and the quick cooking time keeps the dish fresh. Garnish with a squeeze of lime for a citrusy finish.
Herb‑Infused Noodles
Stir a handful of chopped fresh cilantro or basil into the broth just before serving. The herbs add a bright, fresh note that lifts the heaviness of the coconut. It’s a simple tweak that transforms the bowl into a vibrant, aromatic experience.
Breakfast Ramen
Add a splash of maple syrup to the broth and top with a fried egg, bacon bits, and a drizzle of hot sauce. This savory‑sweet combo turns the dish into a hearty breakfast that’s both comforting and indulgent.
Storing and Bringing It Back to Life
Fridge Storage
Store the broth in an airtight container for up to 3 days in the refrigerator. The coconut will separate slightly; simply stir before reheating. Keep the katsu separate on a paper towel to prevent sogginess.
Freezer Friendly
The broth can be frozen for up to 2 months. Freeze in portioned containers, and thaw overnight in the fridge before reheating. The katsu can also be frozen; reheat in a skillet to restore crispness.
Best Reheating Method
Reheat the broth over low heat, adding a splash of water if it has thickened. For the katsu, finish in a hot pan for a few minutes to crisp it back up. Serve immediately for the best texture and flavor.