Picture the chaos of a kitchen that’s been turned into a chocolate battlefield: melted butter, sifted cocoa, and a dozen eggs scattered like a rainbow after a thunderstorm. I was halfway through a birthday party, the guests already demanding a treat, when I realized I had only one sheet pan, a bag of chocolate chips, and a half‑baked cookie dough that had somehow survived the fridge’s temperature swing. I stared at the dough, the sweet scent of sugar and cocoa dancing in the air, and thought, “This is the moment to rewrite the cookie rulebook.”
That day, the oven door was a portal to a world where cookies could be both soft and crisp, where chocolate could melt into molten rivers while the edges stayed firm like a gentle crunch. The kitchen hummed with the gentle pop of butter melting, the faint hiss of sugar caramelizing, and the rhythmic beat of my heart as I whisked the batter into a glossy, chocolate‑laden cloud. I could almost taste the first bite, the way the chocolate chips would burst like fireworks, the way the sugar would coat my tongue with a silky, caramel undertone.
What makes this recipe stand out is not just the double dose of chocolate, but the harmony of textures and flavors that I’ve engineered after countless attempts and a few burnt disasters. I’ve combined the best of both worlds: a chewy, buttery center that melts in your mouth, and a slightly crisp perimeter that gives you that satisfying snap. The result? Cookies that feel like a chocolate hug, but with an edge of sophistication that even the most seasoned pastry lovers will applaud.
There’s one twist you’ll be surprised by: a pinch of sea salt that doesn’t just balance sweetness—it actually enhances the chocolate’s depth, making each bite feel richer. I dare you to taste this and not go back for seconds. By the end, you’ll wonder how you ever made a cookie any other way. Let me walk you through every single step — by the end, you'll wonder how you ever made it any other way.
What Makes This Version Stand Out
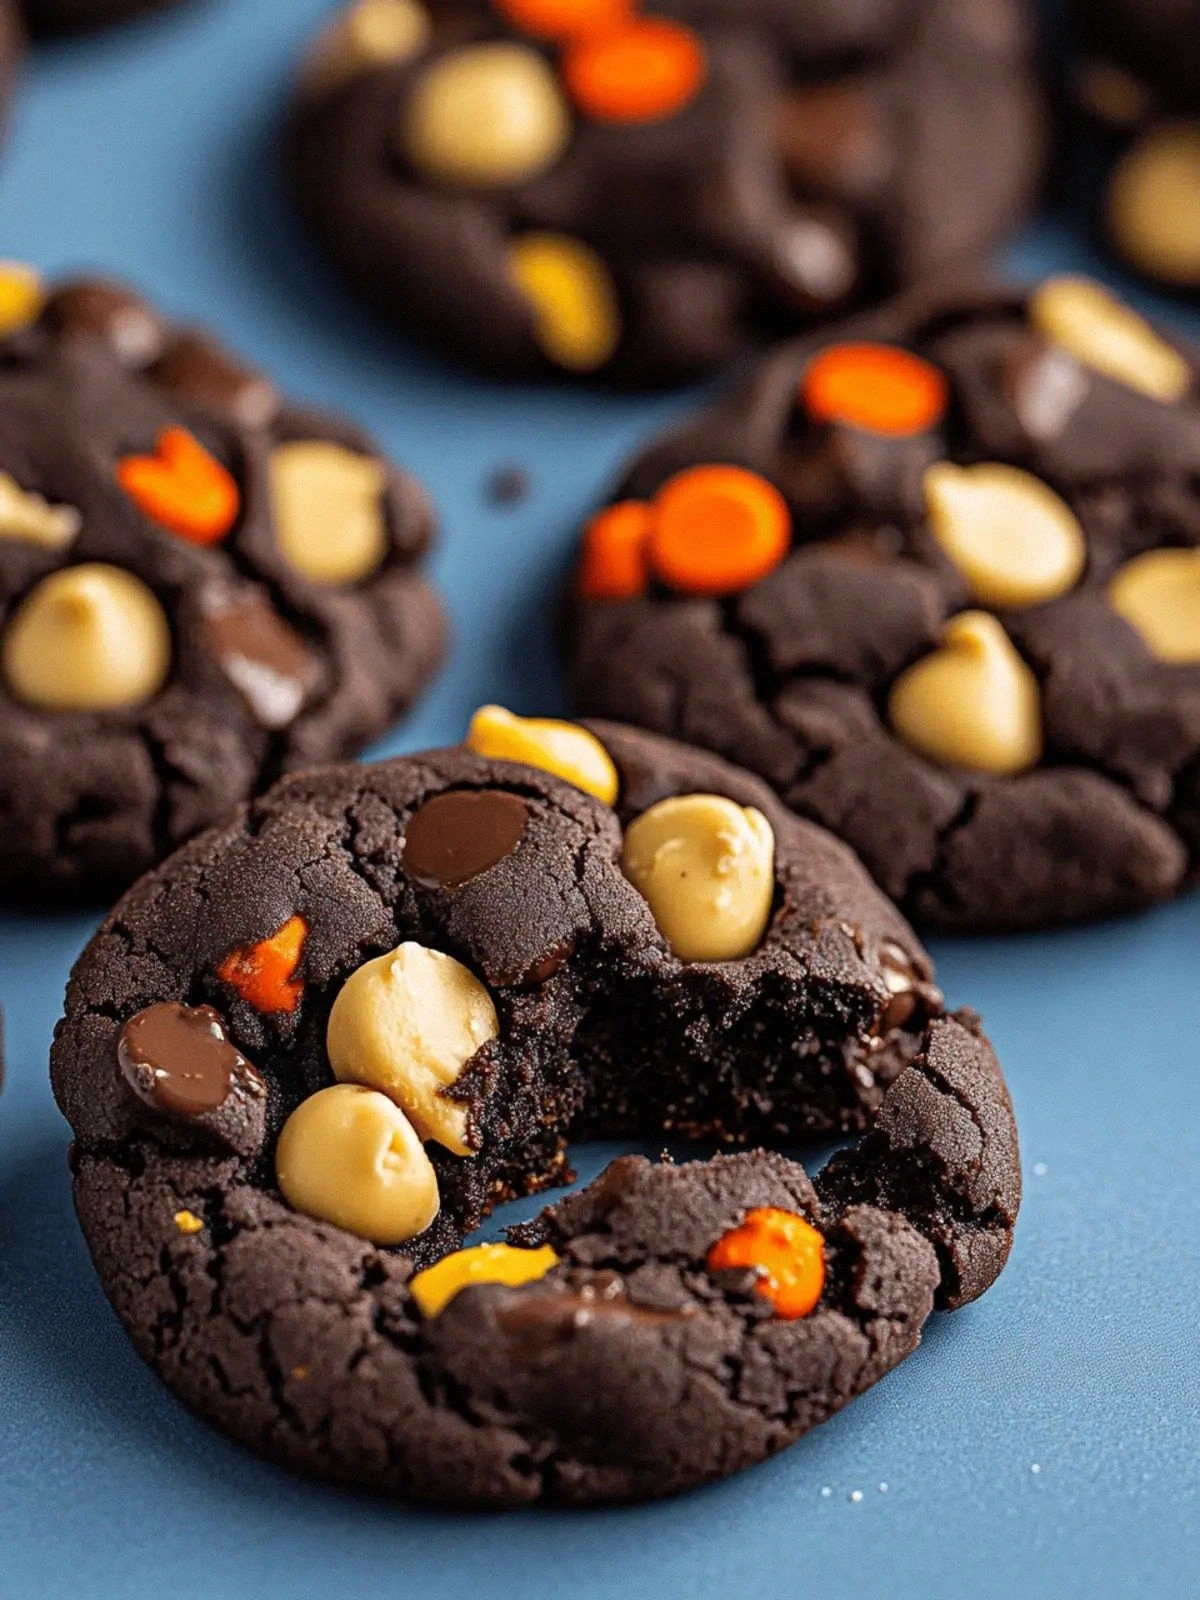
- Flavor: The dual cocoa powder and chocolate chips create layers of chocolate intensity that melt into a silky, velvety finish.
- Texture: The balance of white and brown sugar gives a chewy core while the butter and baking soda provide a tender crumb.
- Color: Rich, dark chocolate tones that make the cookies look as decadent as they taste.
- Ease: No fancy equipment needed—just a mixing bowl, a whisk, and a sheet pan.
- Make‑ahead: Dough can be prepared a day ahead, refrigerated, and baked when the moment calls.
- Party Ready: Sprinkle a handful of rainbow or metallic sprinkles for a festive birthday vibe.
- Healthier Option: Swapping brown sugar for coconut sugar or using dark chocolate chips can tweak the calorie profile.
- Versatility: Works as a dessert, snack, or a sweet treat for a movie night.
Alright, let's break down exactly what goes into this masterpiece…
Inside the Ingredient List
The Flavor Base
All-purpose flour is the backbone of the dough, providing structure while remaining soft enough for a tender crumb. A generous cup of cocoa powder adds a deep, rich chocolate flavor that coats every bite. If you skip the cocoa, the cookies will taste like plain sugar cookies—no wonder many people forget to add it.
Baking soda is the secret lift that makes the cookies rise just enough for a light, airy texture. Without it, the dough would be flat and dense, and you’d have to fight for the same amount of chocolate. A pinch of sea salt is the flavor enhancer that brings out the chocolate’s sweetness and balances the caramel undertones from the sugars.
The Texture Crew
Unsalted butter is the key to a rich, buttery mouthfeel and a golden crust. The butter’s fat content melts into the dough, creating pockets that soften when baked. If you substitute salted butter, you’ll need to reduce the added salt by half to avoid an overly salty cookie.
White and brown sugar work together to add sweetness and moisture. White sugar keeps the cookies from browning too quickly, while brown sugar contributes caramel flavors and a slightly sticky texture. Skipping brown sugar will result in a cookie that feels too dry and lacks depth.
The Unexpected Star
Eggs bind the dough and add a subtle richness that makes the cookies feel substantial. Two eggs for four servings strike the perfect balance between structure and tenderness. If you’re vegan, try using flaxseed meal mixed with water as an egg substitute.
Vanilla extract amplifies every flavor component, giving the cookies a fragrant, comforting aroma. A splash of almond or hazelnut extract can create a nutty twist, but vanilla remains the classic choice for maximum depth.
The Final Flourish
Chocolate chips or chunks are the star of the show—each bite delivers a molten chocolate explosion. Use high‑quality dark chocolate chips for a richer, more complex flavor. If you prefer a sweeter cookie, opt for milk chocolate chips.
Optional sprinkles add a playful birthday vibe and a splash of color. They also give the cookies a subtle crunch that contrasts with the chewy center. Don’t be afraid to experiment with different colors or metallic flakes for a glamorous finish.
Everything's prepped? Good. Let's get into the real action…

The Method — Step by Step
- Preheat the oven to 350°F (175°C). Line a baking sheet with parchment paper to prevent sticking. This step ensures even heat distribution and a golden crust. The smell of the oven will start to mingle with the sweet aromas of butter and sugar, setting the mood for a delightful baking session.
- Mix dry ingredients. In a medium bowl, whisk together 2 cups all‑purpose flour, 1 cup cocoa powder, 1 teaspoon baking soda, and 1 teaspoon salt. Sifting the flour and cocoa helps avoid lumps and ensures a smooth batter. The dry mix forms the structural foundation of the cookie, so give it a good whisk.
- Cream butter and sugars. In a large bowl, beat 1 cup unsalted butter, 1 cup white sugar, and 1 cup brown sugar until light and fluffy. The butter should be at room temperature to create air pockets. This creates the buttery base that gives the cookie its melt‑in‑your‑mouth texture.
- Add eggs and vanilla. Beat in 2 eggs, one at a time, then stir in 2 teaspoons vanilla extract. The eggs bind the dough and add richness, while vanilla deepens the chocolate notes. Make sure each egg is fully incorporated before adding the next.
- Combine wet and dry. Gradually add the dry mix to the wet, folding gently until just combined. Overmixing can toughen the dough, so stop as soon as there are no streaks of flour. The dough should be thick but pliable.
- Fold in chocolate chips. Stir in 2 cups chocolate chips or chunks, reserving a handful for topping if desired. The chips will melt slightly during baking, creating pockets of gooey chocolate. This is the moment where the cookie truly becomes a chocolate lover’s dream.
- Shape the dough. Drop rounded tablespoonfuls onto the prepared sheet, spacing them 2 inches apart. For a more uniform size, use a small cookie scoop. Press lightly to flatten the tops, ensuring even baking.
- Bake for 12–14 minutes. The edges should be set and lightly golden, while the centers remain soft. They will firm up as they cool. Keep a close eye on the first batch to avoid overbaking.
- Cool on the sheet for 5 minutes. Then transfer to a wire rack to cool completely. This allows the cookies to set and the chocolate to harden slightly, creating that perfect bite. The scent of freshly baked cookies will fill the kitchen.
- Add sprinkles. While still warm, sprinkle a pinch of rainbow or metallic sprinkles on each cookie. The heat will slightly melt the chocolate, making the sprinkles adhere beautifully. This finishing touch turns the cookies into a festive treat.
Insider Tricks for Flawless Results
The Temperature Rule Nobody Follows
Many bakers bake at 375°F, but 350°F gives a better rise and keeps the center tender. The lower temperature allows the chocolate to melt slowly, creating those coveted molten pockets. If you’re using a convection oven, reduce the temperature by 25°F to avoid over‑browning.
Why Your Nose Knows Best
The aroma of butter and sugar caramelizing signals that the cookies are almost ready. Your nose can detect subtle changes in scent that indicate the perfect bake time. I’ve learned to trust that sweet, buttery smell before the timer even rings.
The 5‑Minute Rest That Changes Everything
Letting the cookies sit on the pan for five minutes after baking lets the heat finish cooking the center, resulting in a chewy interior that’s not overcooked. This short rest also helps the chocolate set just enough to hold its shape when you pick it up.
Eggs: The Secret Moisture Boost
If you’re on a low‑carb or keto diet, try substituting one egg with an egg white. This keeps the cookie moist while cutting down on yolk fat. I once made a batch with only egg whites, and the cookies were lighter but still chocolatey.
Chocolate Chips vs. Chunks
Using chocolate chunks instead of chips gives a more robust flavor and a slightly thicker melt. The chunks hold their shape longer, providing a contrast between the chewy dough and the chocolate center. I’ve used both in different batches, and both have their fans.
Creative Twists and Variations
This recipe is a playground. Here are some of my favorite ways to switch things up:
Nutty Delight
Add ½ cup chopped walnuts or almonds to the dough for a crunchy texture. The nuts complement the chocolate and add a subtle earthy flavor. They’re perfect for a holiday twist.
Spiced Surprise
Stir in ¼ teaspoon cinnamon or a pinch of cayenne pepper for a warm, spicy kick. The spice pairs wonderfully with dark chocolate and gives the cookies a unique depth.
Minty Fresh
Add 1 teaspoon peppermint extract and a few drops of green food coloring. The mint undertone balances the sweetness and gives the cookies a refreshing twist.
Caramel Crunch
Fold in ¼ cup caramel bits or drizzle caramel sauce over the cookies after baking. The caramel adds a gooey sweetness that pairs well with chocolate.
Vegan Version
Replace butter with melted coconut oil, use flaxseed eggs, and opt for plant‑based chocolate chips. The texture remains chewy, and the flavor is just as rich.
Gluten‑Free Take
Swap all‑purpose flour for a gluten‑free blend, ensuring it contains xanthan gum for structure. The cookies will still rise and maintain a tender crumb.
Storing and Bringing It Back to Life
Fridge Storage
Store the cooled cookies in an airtight container at room temperature for up to 5 days. If you’re in a humid area, add a slice of bread to absorb moisture and keep the cookies chewy. The container should be sealed tightly to prevent the cookies from drying out.
Freezer Friendly
Freeze the cookies in a single layer on a parchment‑lined tray for 2–3 hours, then transfer to a freezer bag. They’ll stay fresh for up to 3 months. When you’re ready to enjoy, let them thaw at room temperature for 20 minutes.
Best Reheating Method
Reheat in a 350°F oven for 5 minutes or in a microwave on medium power for 15–20 seconds. Add a tiny splash of water before reheating to create steam, which will help the cookies regain their soft, chewy texture. A quick dip in the oven is the secret to a fresh‑baked feel.