I still remember the night I tried to rescue a soggy, over‑cooked chicken parmesan from the oven, only to end up with a greasy, flavorless mess that made my taste buds question their own existence. The kitchen smelled like burnt onions and stale sauce, and my friend, a seasoned chef, stared at me and said, “You’re going to have to do better than that.” That moment became the spark that pushed me to re‑imagine the classic Italian favorite with a gluten‑free twist, a version that would make even the most skeptical foodies swoon. I’m not just talking about swapping out breadcrumbs for something gluten‑free; I’m talking about a complete overhaul that elevates flavor, texture, and presentation to an art form.
Picture this: a golden, crisp coating that cracks like brittle snowflakes, revealing tender, juicy chicken inside, all smothered in a sauce that clings to the meat like velvet. The aroma that wafts through the kitchen is a heady mix of garlic, oregano, and simmering tomatoes, with a hint of fresh basil that lifts the dish into a fragrant cloud. The moment you take that first bite, the crunch gives way to a melt‑in‑your‑mouth softness, and the cheese pulls in a silky string of gooey delight. Every element is orchestrated to create a symphony of flavors that feels both familiar and astonishingly new.
What sets this version apart is not just the gluten‑free flour or the extra parmesan; it’s the way each component works together to create a dish that feels indulgent yet approachable. I’ve streamlined the process, eliminated common pitfalls, and added a few secret ingredients that give the sauce depth and the crust an unbeatable crunch. Whether you’re a seasoned cook or a culinary newbie, this recipe is designed to be approachable, forgiving, and absolutely unforgettable. If you’re ready to upgrade your chicken parmesan game, let me walk you through every single step — by the end, you’ll wonder how you ever made it any other way.
And here’s the kicker: I’ve discovered a tiny, often‑overlooked ingredient that transforms the entire dish— a splash of lemon zest that brightens the sauce and cuts through the richness, giving the meal a fresh, vibrant edge. Trust me, I dare you to taste this and not go back for seconds. This is hands down the best version you’ll ever make at home, and I’m about to share every secret that makes it so. If you’ve ever struggled with a soggy crust or bland sauce, you’re not alone— and I’ve got the fix. Let’s dive in.
What Makes This Version Stand Out
- Crust: A gluten‑free flour blend creates a crisp, golden shell that resists sogginess, unlike traditional breadcrumbs that absorb sauce.
- Cheese: Combining Parmesan and mozzarella gives a layered melt with a sharp finish that balances the richness of the sauce.
- Flavor Depth: A blend of garlic powder, onion powder, and Italian seasoning infuses the coating with subtle, aromatic layers.
- Sauce Texture: Using a thickened marinara with crushed tomatoes and a dash of tomato paste gives body and prevents sloshing.
- Ease: The assembly process takes less than 15 minutes—ideal for busy weeknights.
- Make‑ahead: You can prep the chicken and sauce a day ahead and reheat without losing quality.
- Presentation: A drizzle of olive oil, fresh basil, and a touch of lemon zest elevate the dish visually and palatably.
- Guest Appeal: Even gluten‑sensitive diners will feel included, and the dish can be served family‑style or plated individually.
Alright, let’s break down exactly what goes into this masterpiece…
Inside the Ingredient List
The Flavor Base
At the heart of any great chicken parmesan is a sauce that sings. I use a robust marinara made from crushed tomatoes, a spoonful of tomato paste, fresh garlic, and a pinch of red pepper flakes. The sauce should reduce to a thick, glossy consistency that clings to the chicken. If you skip the reduction, the dish will feel watery and underwhelming. A good tip: simmer the sauce on low heat for at least 15 minutes to develop depth without scorching.
If you’re a fan of a more herbaceous profile, add a tablespoon of fresh oregano or basil during the last five minutes of simmering. This not only brightens the flavor but also adds a subtle aroma that elevates the dish. For a smoky twist, a dash of smoked paprika can give the sauce an unexpected edge. Always taste before seasoning; the acidity of tomatoes can mask subtle spices.
Buying the right tomatoes is crucial. Look for San Marzano or plum tomatoes; they’re sweeter and have less acidity, which balances the sauce. If you can’t find them, a high‑quality canned crushed tomato works just fine. The key is to avoid overly watery varieties that will dilute the sauce.
Remember, the sauce isn’t just a backdrop; it’s a character that carries the dish. Think of it as the orchestra that brings all the other instruments to life. If you’re in a hurry, you can use a store‑bought marinara, but be sure to reduce it to avoid excess liquid.
The Texture Crew
The coating is where the gluten‑free magic happens. I combine a gluten‑free all‑purpose flour blend with a pinch of salt, garlic powder, and Italian seasoning. This mixture creates a slightly dry surface that absorbs the egg wash and holds the breadcrumbs. The gluten‑free breadcrumbs—ideally crushed cornflakes or a dedicated gluten‑free breadcrumb mix—provide crunch without the gluten.
If you’re using regular breadcrumbs, you can still avoid gluten by soaking them in a tablespoon of milk or water for 30 minutes before using. This helps them absorb moisture and crisp up nicely. For a nutty flavor, you can pulse a handful of toasted almonds into the breadcrumb mix.
The key to a perfect crust is the egg wash. Beat the eggs with a splash of milk, then dip each chicken breast in the mixture before coating it in the flour and breadcrumb combo. This double‑coating ensures a golden, crunchy exterior that doesn’t crumble during baking.
The Unexpected Star
Lemon zest isn’t just a garnish; it’s a secret weapon that brightens the sauce and cuts through the richness of the cheese. I grate about one tablespoon of lemon zest and fold it into the sauce just before baking. The citrus oils release a fresh burst of flavor that lingers on the palate. If you’re not a fan of citrus, you can substitute a teaspoon of vinegar or a splash of white wine for acidity.
Another unexpected star is the fresh basil leaves sprinkled on top before serving. They add a peppery, sweet aroma that elevates the dish’s visual appeal. For a more robust flavor, you can also add a few fresh thyme sprigs during baking.
If you’re adventurous, try adding a tablespoon of capers to the sauce; they bring briny depth that balances the sweet tomatoes. Just be sure to rinse them well to avoid excess saltiness.
The Final Flourish
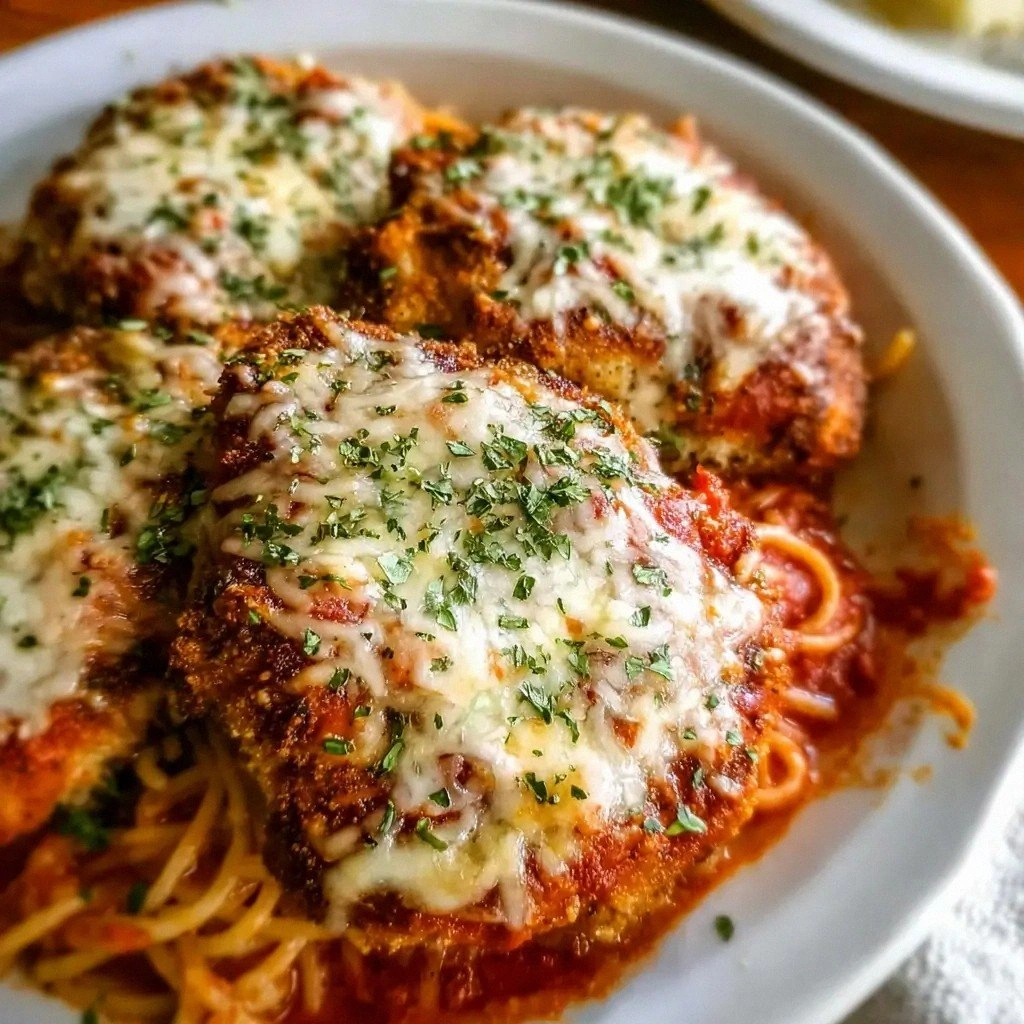
The final step is the cheese layer. I layer grated Parmesan over the sauce, then sprinkle shredded mozzarella on top. The combination creates a gooey, golden crust that melts into a velvety blanket over the chicken. If you prefer a sharper cheese, add a sprinkle of Pecorino Romano for a tangy finish.
For a dramatic finish, drizzle a tablespoon of high‑quality olive oil over the top before baking. This not only adds shine but also infuses a subtle fruity note that complements the cheese. Once baked, let the dish rest for a few minutes; the cheese will set slightly, making slicing easier.
Everything’s prepped? Good. Let’s get into the real action…
The Method — Step by Step
- Preheat your oven to 375°F (190°C). Line a baking sheet with parchment paper or a silicone mat. This ensures the chicken won’t stick and makes cleanup a breeze. Let the sheet sit while you assemble the chicken.
- Pat the chicken breasts dry with paper towels; this helps the coating stick. Season each breast generously with salt, pepper, and a pinch of Italian seasoning. I always season the inside of the chicken as well—just to be safe.
- Set up a dredging station: a shallow dish of gluten‑free flour, a bowl with beaten eggs mixed with a tablespoon of milk, and a third dish of breadcrumbs. This classic breading technique ensures a crisp, uniform coating.
- Coat each breast first in flour, shaking off excess. Dip into the egg wash, allowing any excess to drip. Finally, press into the breadcrumb mixture, pressing gently to adhere. The double‑coating trick is key to a crunchy crust.
- Place the coated breasts on the prepared baking sheet. Bake for 15 minutes, then flip and spoon a generous ladle of sauce over each breast. The sauce should coat the top, creating a glossy, aromatic layer.
- Sprinkle grated Parmesan evenly over the sauce. Then, cover the top with shredded mozzarella. The cheese will melt into a golden, bubbly blanket. If you like a crisp top, switch the oven to broil for the last 2–3 minutes, watching carefully.
- Once the cheese is bubbling and golden, remove the chicken from the oven. Let it rest for 5 minutes—this allows the juices to redistribute and the cheese to set slightly, making slicing easier.
- Garnish with fresh basil leaves, a drizzle of olive oil, and a sprinkle of lemon zest. Serve immediately over cooked spaghetti or gluten‑free pasta, spooning extra sauce over the noodles. The dish should feel like a comforting hug, with a crispy exterior, savory interior, and a sauce that coats like velvet.
- Enjoy your masterpiece! And remember, the real magic is in the details—every seasoning, every coat, every minute of baking.
That’s it— you did it. But hold on, I've got a few more tricks that'll take this to another level. These insider tips will help you avoid common mishaps and elevate the dish to restaurant quality.
Insider Tricks for Flawless Results
The Temperature Rule Nobody Follows
Many cooks bake at a high temperature, thinking it speeds up cooking, but it can burn the cheese before the chicken is done. I recommend baking at 375°F (190°C) and then broiling for the last 2 minutes if you want a golden top. This low‑to‑mid heat ensures the chicken cooks evenly, and the cheese melts beautifully without scorching. If you’re using a convection oven, reduce the temperature by 25°F (14°C) to avoid over‑browning.
Why Your Nose Knows Best
Smell is a powerful indicator of doneness. When the sauce starts to bubble and the cheese is bubbling, you’re close to perfection. If you’re unsure, use a thermometer—the chicken should reach an internal temperature of 165°F (74°C). Trust your nose; the aroma of toasted breadcrumbs and melted cheese signals readiness.
The 5-Minute Rest That Changes Everything
After baking, let the chicken rest for 5 minutes. This resting period allows the juices to redistribute, preventing them from spilling onto the plate when you cut. It also gives the cheese a chance to set, making slicing smoother and preventing a gooey mess.
The Lemon Zest Secret
A tablespoon of fresh lemon zest brightens the sauce and cuts through the richness. If you’re worried about bitterness, use only half a teaspoon at first, then adjust to taste. The citrus oils are potent, so start small. The result is a lift that makes the dish feel lighter and more vibrant.
The Extra Crispy Edge
If you love a crunchier crust, double the breadcrumb coating. After the first coat, let the chicken rest for 10 minutes before applying a second layer. The extra coating will crisp up beautifully during baking, giving you that satisfying, thin‑crust crunch that shatters like thin ice.
The Quick Fix for a Wet Sauce
If you find the sauce too watery, finish it off by adding a tablespoon of tomato paste and simmering for an extra 5 minutes. The paste thickens the sauce and concentrates the flavor. Alternatively, let the sauce reduce on a low flame until it reaches your desired consistency.
Creative Twists and Variations
This recipe is a playground. Here are some of my favorite ways to switch things up:
Mediterranean Marvel
Swap the marinara for a roasted red pepper sauce, add Kalamata olives, and top with crumbled feta. The smoky pepper and briny olives give a Mediterranean vibe that pairs wonderfully with the chicken.
Spicy Sriracha Kick
Stir in a tablespoon of Sriracha into the sauce for a fiery punch. Complement with a handful of sliced green onions and a squeeze of lime. The heat balances the richness and adds a fresh zing.
Herb‑Infused Parmesan
Mix fresh rosemary and thyme into the breadcrumb coating. The herbs infuse the crust with aromatic depth, and the resulting flavor profile feels like a rustic Italian trattoria.
Cheese Lover’s Dream
Add a layer of provolone or fontina before the mozzarella. The extra cheese creates a gooey, molten center that’s hard to resist. Pair with a drizzle of balsamic reduction for a sweet contrast.
Low‑Carb Variation
Use almond flour instead of gluten‑free flour, and replace breadcrumbs with crushed pork rinds. The result is a crunchy, low‑carb crust that still delivers on flavor. Serve over zucchini noodles for a complete low‑carb meal.
Vegan Version
Swap the chicken for eggplant slices, use a plant‑based cheese, and replace the egg wash with a mixture of almond milk and nutritional yeast. The eggplant absorbs the sauce beautifully, and the cheese substitute melts into a creamy topping.
Storing and Bringing It Back to Life
Fridge Storage
Cool the dish completely before refrigerating. Store in an airtight container for up to 3 days. The crust may soften, but the sauce and cheese remain flavorful. When reheating, cover with foil to keep the cheese from drying out.
Freezer Friendly
Wrap the cooked chicken parmesan tightly in plastic wrap, then place in a freezer bag. Freeze for up to 2 months. Thaw overnight in the fridge before reheating. The texture stays close to fresh, especially if you reheat in the oven at 350°F (175°C) for 15 minutes.
Best Reheating Method
Reheat in a preheated oven at 350°F (175°C) for 10–12 minutes, or until warmed through. Add a splash of water or broth before reheating; this steams the dish back to its original moistness and prevents the cheese from becoming rubbery. Finish with a quick broil if you want the crust crisp again.