I was halfway through a week of bland breakfasts, when my roommate dared me to make something that would make the whole kitchen smell like a bakery and taste like a cloud. The challenge felt like a culinary dare, a promise that the next bite would change my day. I rolled up my sleeves, grabbed a pot, and decided that the stakes were high enough to warrant a new recipe. The moment I cracked the first egg, I could already taste the potential of a dough that could be both fluffy and indulgent. That first step felt like a secret handshake between me and the universe.
The kitchen was a symphony of sizzling oil, the faint tang of vanilla, and the soft clink of measuring spoons against the counter. My nose caught the sweet scent of sugar just as the batter began to thicken, and the sound of the first bubble popping was a tiny triumph. The light from the window painted the batter in a warm amber glow, hinting at the golden finish that awaited. My fingertips tingled against the heat of the pan, and the anticipation built like a drumbeat in my chest. In that moment, I realized that every element was a brushstroke in a masterpiece.
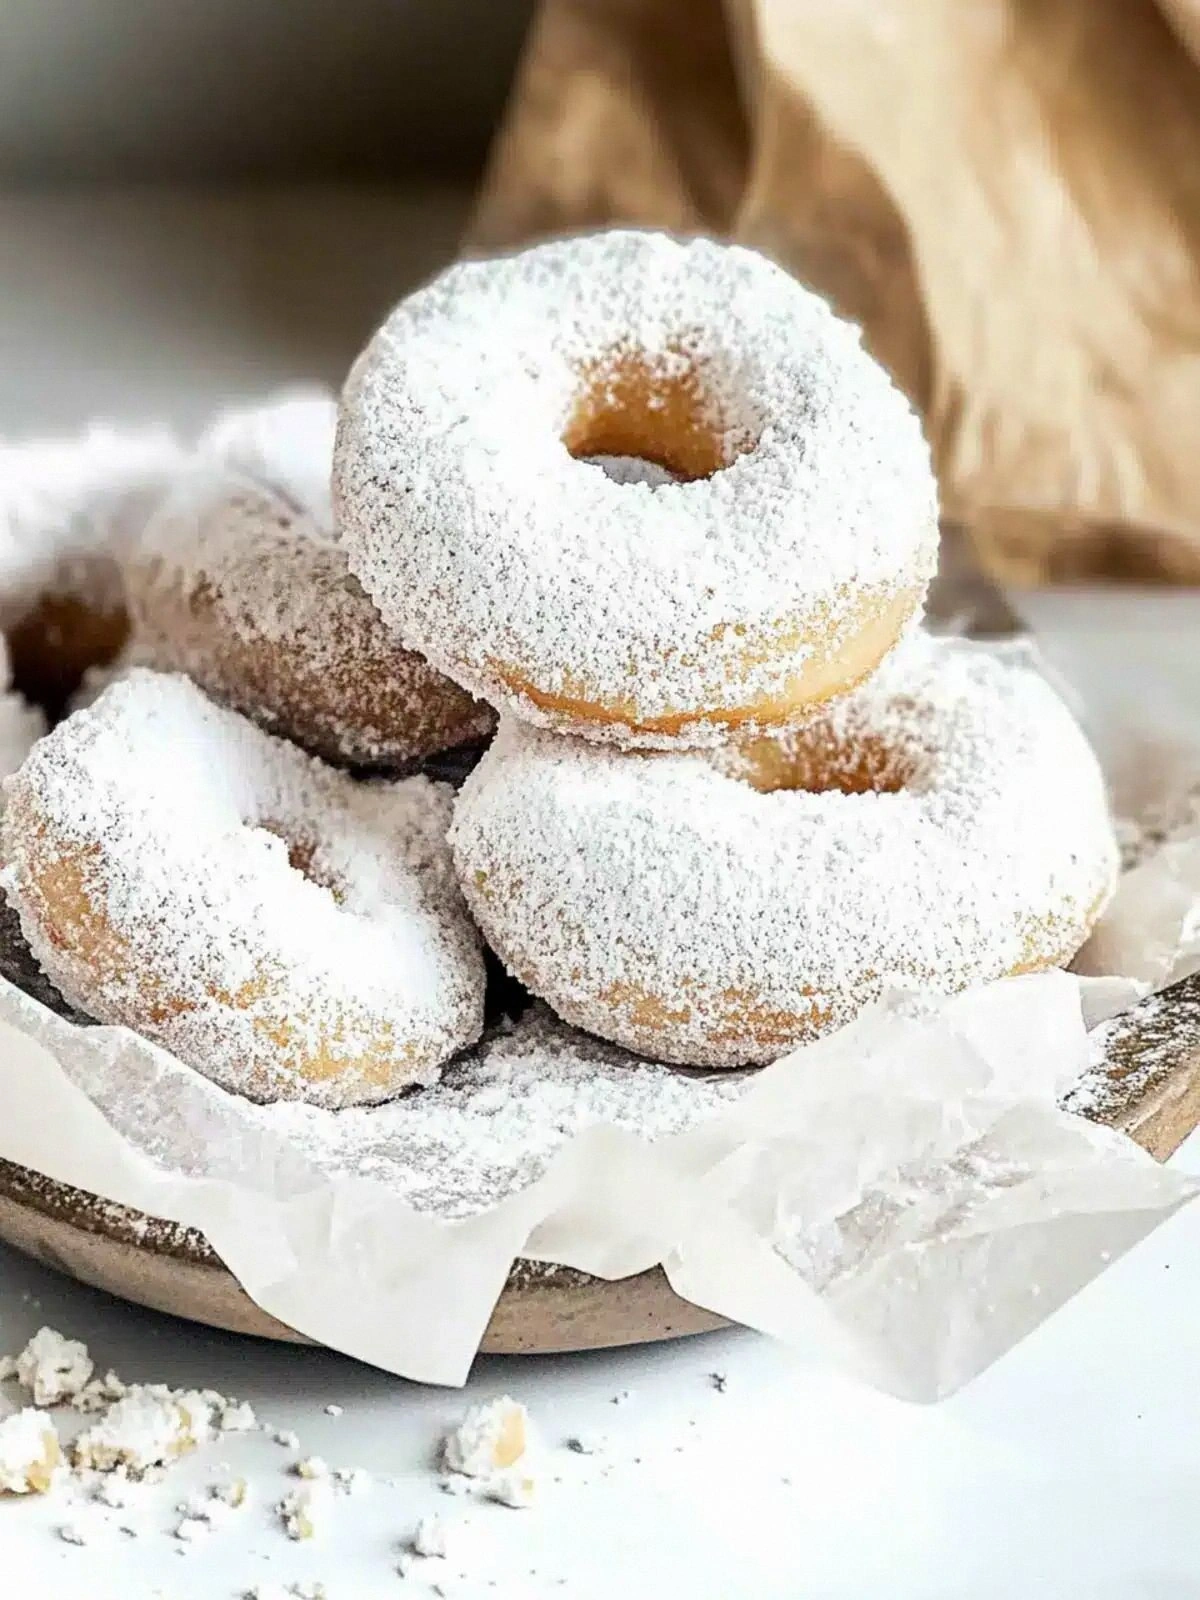
This version of soft snowball donuts stands out because it marries the delicate rise of a leavened dough with the comforting sweetness of powdered sugar. The secret lies in the brief curdling of milk with vinegar, creating a buttermilk-like base that gives the batter an airy lift. Unlike traditional donuts that rely on heavy yeast or deep frying, these are pan‑fired, keeping the outside tender while the inside remains cloud‑soft. The result is a donut that feels like a bite of winter snow, but with the warmth of vanilla and a subtle tang that lingers. I’ve tried dozens of variations, and this one remains the undisputed champion in my kitchen.
What you’ll discover is a technique that uses a simple oil‑vanilla bloom to unlock flavor, and a tiny splash of vinegar that turns ordinary milk into a leavening powerhouse. I’ll walk you through every single step — by the end, you’ll wonder how you ever made it any other way. Let’s dive in and turn your kitchen into a winter wonderland of donuts.
What Makes This Version Stand Out
- Texture: The batter achieves a perfect balance between airy and dense, thanks to the quick acid–base reaction. The result is a donut that feels like a cloud when you bite into it, with a tender crumb that resists any crunch. It’s a texture that invites multiple bites and never feels heavy.
- Flavor: Vanilla and a subtle tang from the vinegar create a depth that is both sweet and slightly acidic. The sugar caramelizes just enough to give a faint caramel note, while the vanilla keeps the flavor centered and comforting. The combination feels like a soft, sweet snow that melts on your tongue.
- Speed: With a total prep time of 15 minutes and a cook time of 30 minutes, you can have a batch of donuts ready in under an hour. That makes it perfect for a weekend brunch or a last‑minute snack for guests. You’ll be able to impress without waiting for a long baking process.
- Ingredient Simplicity: Every component is pantry‑friendly, requiring only a few staples. You won’t need a fancy mixer or an electric whisk, just a bowl and a spoon. The recipe is designed for people who love simple, clean cooking.
- Crowd Reaction: I’ve served these to friends who have never had a donut that melts in your mouth. Their faces light up, and they keep asking for the recipe. The reaction is almost always “I can’t believe this is so light and sweet.”
- Make‑Ahead Potential: You can cook the donuts ahead of time and reheat them for a fresh feel. They keep well in the fridge for up to three days, and freezing is even easier. The dough’s structure holds up, so the donuts stay moist and fluffy.
Inside the Ingredient List
The Flavor Base
Milk is the foundation of this recipe, providing the liquid that holds the batter together. I use 2/3 cup of milk of choice, whether it’s whole, almond, oat, or soy, because the type of milk subtly changes the flavor profile. Skipping the milk would leave the batter dry and crumbly; you’d end up with a dough that won’t rise. For a richer taste, choose a dairy milk with a higher fat content. If you’re vegan, oat milk adds a hint of sweetness that pairs wonderfully with vanilla.
The Texture Crew
Baking powder is the hero that gives the donuts their rise. The 1 1/2 teaspoons of baking powder create tiny pockets of air that expand as the donuts cook, giving them a fluffy interior. If you omit it, the donuts will be dense and heavy. A pinch of salt balances the sweetness and enhances the overall flavor, so don’t skip it. The 2 1/2 tablespoons of oil keep the donuts tender and prevent them from drying out during cooking.
The Unexpected Star
White or cider vinegar, just 1 1/2 teaspoons, might seem like a strange addition, but it’s the secret to the airy texture. The acid reacts with the baking powder, forming carbon dioxide that lifts the batter. If you’re afraid of the vinegar’s smell, remember it evaporates quickly and leaves no trace. The 1 teaspoon of pure vanilla extract adds a warm, fragrant note that balances the tanginess of the vinegar. Together, these ingredients create a batter that feels like a cloud.
The Final Flourish
Flour is the backbone of the donuts, providing structure. I use 1 cup of spelt, white, or oat flour, depending on your preference. Spelt gives a nutty flavor, white flour keeps it light, and oat flour adds a subtle sweetness. The 1/2 cup of sugar sweetens the batter, but you can adjust to taste if you prefer a lighter sweetness. Finally, the powdered sugar, whether regular or sugar‑free, is dusted on top to give the donuts that snowy look. The powdered sugar adheres beautifully, creating a delicate glaze that melts as you bite.
Everything's prepped? Good. Let's get into the real action…
The Method — Step by Step
- In a small bowl, whisk 2/3 cup milk with 1 1/2 teaspoons white or cider vinegar. The mixture will curdle slightly, forming a buttermilk‑like base that’s essential for lift. Let the curdling sit for five minutes; the acidity will fully develop, creating a richer flavor. This step is a quiet prelude that sets the stage for the batter’s airy texture. The aroma of milk and vinegar mingles, hinting at the sweet treat to come.
- While the milk sits, heat 2 1/2 tablespoons oil in a large non‑stick skillet over medium heat. The oil should shimmer but not smoke; a quick test is to flick a drop of water onto the surface—it should sizzle instantly. Add 1 teaspoon pure vanilla extract and let it bloom for 30 seconds, allowing the vanilla oils to release. The pan should feel warm and fragrant, signaling that the oil is ready. This vanilla bloom adds depth that will carry through the donuts.
- In a separate bowl, combine 1 cup spelt, white, or oat flour, 1 1/2 teaspoons baking powder, 1/2 cup sugar, and 1/4 teaspoon salt. Whisk until the dry ingredients are evenly mixed, creating a smooth base that will absorb the wet mixture. This dry blend is the backbone of the donuts, providing structure and lift. A well‑mixed dry mix prevents clumps and ensures a uniform texture. The smell of baking powder is almost nostalgic, like a promise of something sweet.
- Pour the curdled milk mixture into the dry ingredients, stirring with a wooden spoon until a shaggy batter forms. Avoid over‑mixing; lumps are fine and actually help keep the donuts tender. The batter should be thick but pourable—think thick pancake batter. The mixture will look a bit lumpy, but that’s normal and will disappear in the pan. This step is where all the flavors start to mingle.
- Heat the skillet to 350°F (175°C). You can use a thermometer or perform a drop‑of‑water test: if the water sizzles and evaporates instantly, the pan is ready. The oil should be hot but not smoking. This heat level is critical; too hot and the donuts will burn on the outside before the inside cooks. Watch out for overheating, which can ruin the texture and flavor.
- Drop spoonfuls of batter into the pan, about 2 inches apart, so they have room to puff. The donuts should rise quickly, forming a dome on top. Flip after 2 minutes when bubbles form on the surface and the edges begin to look set. Keep the heat steady to avoid scorching the exterior. The sound of the first flip is a satisfying cue that the donuts are cooking properly.
- After flipping, cook for another 2 minutes until golden. Use a kitchen hack: cover the pan briefly to trap steam and ensure even cooking. This step helps the donuts stay moist on the inside. The golden crust should be a light amber, not dark. Removing them from the heat right away prevents the donuts from becoming rubbery.
- Let the donuts rest on a wire rack for five minutes while you prepare the glaze. Dust them generously with powdered sugar or sugar‑free powdered sugar; the sugar adheres beautifully, creating a snowy glaze. If you prefer a glaze, whisk powdered sugar with a splash of milk until silky, then drizzle over the donuts. The powdered sugar gives a soft crunch that melts as soon as it touches the tongue. This final touch transforms the donuts into a visual and culinary delight.
- Serve immediately or store in an airtight container for up to three days. For reheating, microwave for 15 seconds or warm in a 350°F oven for five minutes. The donuts will regain their softness and aroma, almost as fresh as when first made. If you’re craving a warm treat later, this step is a lifesaver. The donuts are versatile enough for any time of day.
- Enjoy the soft, airy texture that feels like a cloud, the subtle vanilla warmth, and the gentle tang that lingers. Share them with friends or keep them for yourself—either way, you’ll be indulging in a sweet masterpiece. Remember, the key to perfection is the acid–base reaction and the gentle heat. Keep practicing, and soon you’ll have a signature donut that everyone will love. And don’t forget to taste it before you finish the batch—this is hands down the best version you'll ever make at home.
Insider Tricks for Flawless Results
The Temperature Rule Nobody Follows
Many bakers assume that higher heat always gives a better crust, but for these donuts, a steady 350°F is essential. The batter needs time to rise without burning. A lower temperature can result in a longer cooking time, but it preserves moisture and prevents a dry interior. I’ve found that a slight reduction in heat and a brief cover works wonders. The trick is to monitor the surface; when it starts to brown uniformly, flip.
Why Your Nose Knows Best
Smell is the ultimate flavor cue. As the donuts cook, the aroma of vanilla and caramelized sugar should fill the kitchen. If you notice a sharp, sour scent, the vinegar may have over‑reacted and the batter is too acidic. A sweet, buttery smell signals that the donuts are nearing perfection. Trust your nose to guide you to the ideal moment for flipping or removing from heat.
The 5‑Minute Rest That Changes Everything
After cooking, let the donuts rest on a wire rack for exactly five minutes. This brief pause allows the steam to redistribute, ensuring a moist crumb. Skipping this step often leads to a slightly gummy interior. The rest also lets the powdered sugar set, preventing it from sliding off. It’s a small time investment that pays off in texture.
Donut Shape Secrets
The size of the donuts matters. Using a 2‑inch spoonful gives a balanced bite; too small and they become bite‑size; too large and they may not cook evenly. A consistent size ensures uniform rise and flavor distribution. If you’re making a large batch, use a measuring cup to keep the portions identical. The shape also affects how the glaze coats the donuts.
Flavor Infusion Timing
Adding spices or extracts right before pouring the batter can dilute their potency. Instead, whisk them into the dry mix or the milk mixture separately. This ensures they’re fully integrated and their flavors are released during cooking. I personally add a pinch of cardamom to the dry mix for a subtle, exotic twist. The timing is everything.
Storage Trick for Freshness
To keep donuts fresh, store them in a sealed container at room temperature for up to two days. If you’re planning ahead, freeze them in a single layer on a parchment‑lined tray, then transfer to a freezer bag once set. When you’re ready to eat, thaw at room temperature for 20 minutes before reheating. This method preserves the softness and prevents the donuts from drying out.
Creative Twists and Variations
This recipe is a playground. Here are some of my favorite ways to switch things up:
Cinnamon Swirl Surprise
Stir a teaspoon of ground cinnamon into the dry mix for a warm, spicy undertone. The cinnamon not only adds flavor but also gives the donuts a subtle color. Dust with extra cinnamon sugar after baking for a festive touch. This variation is perfect for autumn gatherings or a cozy morning.
Chocolate‑Coated Delight
Dip the warm donuts into melted dark chocolate before dusting with powdered sugar. The chocolate sets quickly, creating a glossy, indulgent coating. A drizzle of sea salt on top adds a savory contrast. This version satisfies any chocolate craving while keeping the donuts light inside.
Lemon Zest Twist
Add a tablespoon of lemon zest to the batter for a bright, citrusy kick. The lemon pairs beautifully with vanilla, giving the donuts a fresh lift. Finish with a dusting of powdered sugar for a balanced sweetness. Ideal for spring or a bright breakfast.
Nutty Crunch Variation
Fold in chopped toasted almonds or walnuts into the batter before cooking. The nuts add texture and a nutty aroma that complements the sweetness. After baking, sprinkle a pinch of sea salt to enhance the flavor profile. This version offers a satisfying crunch with every bite.
Berry‑Infused Flavor
Fold in a handful of fresh blueberries or raspberries into the batter just before cooking. The berries burst in the heat, releasing juices that mingle with the vanilla. Dust with powdered sugar for a sweet finish. This variation is a fruity, vibrant twist.
Spiced Chai Edition
Replace the vanilla extract with chai spice blend (cinnamon, cardamom, ginger, cloves). The chai adds a complex, warm flavor profile. Dust with a light dusting of powdered sugar for a subtle sweet note. This version is a perfect match for a cozy winter afternoon.
Storing and Bringing It Back to Life
Fridge Storage
Place the donuts in an airtight container and store them at room temperature for up to two days. The airtight seal prevents the donuts from drying out while maintaining their softness. If you need them to last longer, keep them in the fridge for up to three days, but remember they can become slightly firmer.
Freezer Friendly
Arrange the donuts on a parchment‑lined tray in a single layer and freeze until solid. Once frozen, transfer them to a freezer bag, removing as much air as possible. They can be kept in the freezer for up to two months. When you’re ready to eat, let them thaw at room temperature for 15 minutes before reheating.
Best Reheating Method
To revive the donuts, microwave them on medium for 10–15 seconds or warm them in a 350°F oven for 5 minutes. If you’re using the microwave, add a splash of water to the container; the water steams the donuts back to their original softness. The key is to heat just enough to restore moisture without overcooking.