Picture this: you’re in the middle of a rainy evening, the kitchen lights flicker, and you’re craving something that feels both comforting and daring. I tried to whip up a quick stir‑fry, but the shrimp came out rubbery and the sauce tasted flat. That night I discovered a secret combination that turned a simple batch of shrimp into a bowl of liquid velvet and fire, and I’ve been bragging about it ever since.
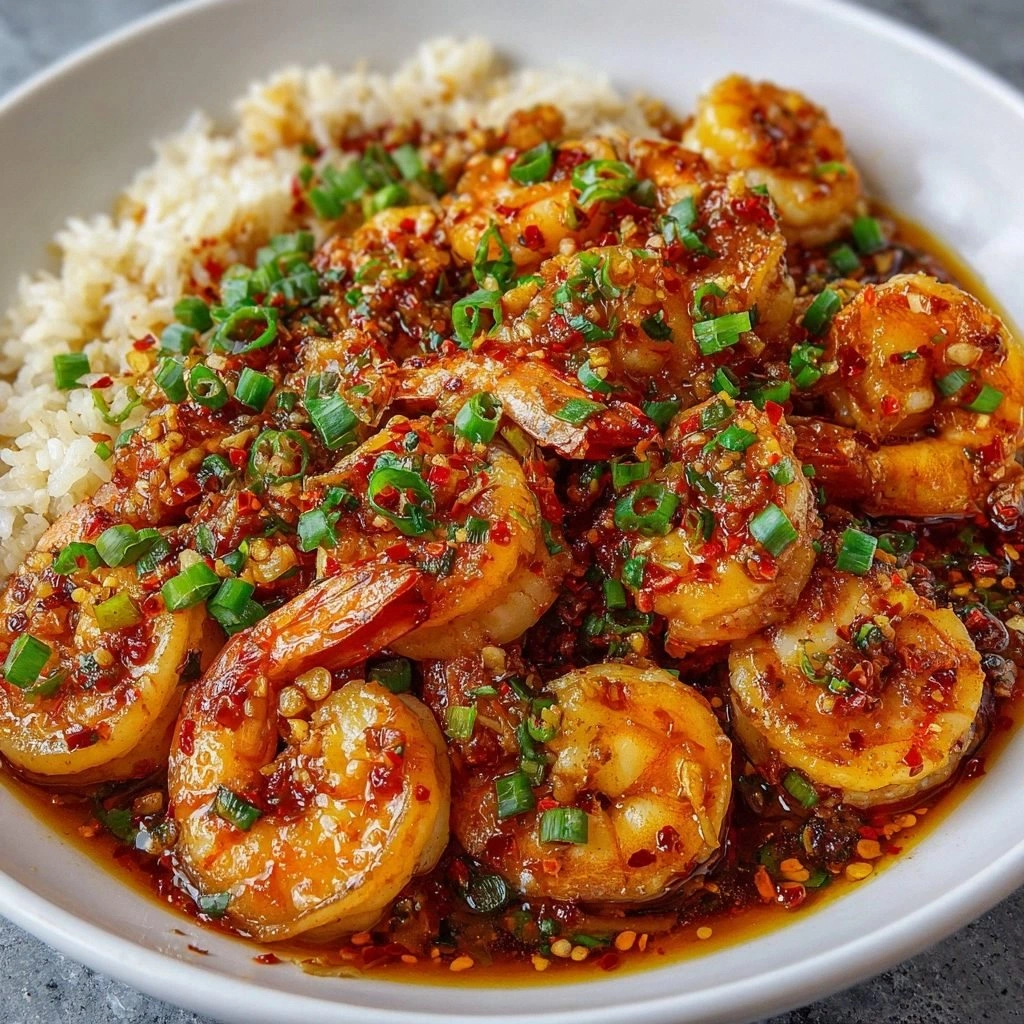
The moment you crack open the pot, the aroma of garlic and ginger rises like a warm hug. The sizzling sound is a promise that the shrimp will be perfectly seared, not overcooked. The bright splash of chili paste paints the air with a bold, slightly sweet heat, and the soy sauce adds a deep, savory undertone that balances the spice. You can almost taste the contrast of the crisp shrimp against the silky sauce, a flavor duet that sings.
What makes this version stand out? I didn’t just follow a recipe—I reimagined it. I swapped the usual soy sauce for a low‑sodium version to keep the dish bright, I added fresh ginger for that zesty kick, and I topped it with green onions for a pop of color and freshness. The result is a bowl that is simultaneously bold, bright, and utterly addictive. I dare you to taste this and not go back for seconds.
If you’ve ever felt like shrimp dishes are boring or too quick, you’re not alone. Most recipes get this completely wrong by over‑cooking the shrimp or under‑seasoning the sauce. Here’s what actually works: a quick sear, a balanced sauce, and a finishing garnish that brings everything together. I’ll be honest—I ate half the batch before anyone else got a chance. And that’s the power of a well‑crafted dish: it’s so good you can’t stop at one bowl.
What Makes This Version Stand Out
- Taste: The sauce is a symphony of heat, umami, and citrusy ginger that coats every shrimp like velvet.
- Texture: Shrimp are seared to a perfect pink center, while the sauce stays silky, not sticky.
- Simplicity: Under 10 ingredients and 30 minutes from prep to plate.
- Uniqueness: The combination of chili paste, soy sauce, and fresh ginger is rarely seen in standard shrimp bowls.
- Crowd Reaction: Friends rave about the heat level and the bright green garnish that looks as good as it tastes.
- Ingredient Quality: Fresh shrimp and fresh ginger make the difference between a good dish and a great one.
- Cooking Method: Quick sear plus a quick sauce finish keeps the shrimp tender.
- Make‑Ahead Potential: The sauce can be pre‑made and stored; just reheat shrimp quickly.
Alright, let's break down exactly what goes into this masterpiece…
Inside the Ingredient List
The Flavor Base
Garlic and ginger are the heart of this dish. Garlic delivers a robust, aromatic depth, while ginger cuts through the heat with a bright, citrusy note. Together, they create a foundation that makes the chili paste feel balanced. If you skip either, the sauce becomes one‑dimensional and the shrimp lose their personality.
The Heat Engine
Chili paste is the source of the dish’s fiery personality. Sambal oelek or any chili paste of your choice adds a punch that lingers without overwhelming. Adjust the amount to match your spice tolerance; 2 tablespoons for a moderate kick or 3 for those who love heat. If you’re looking for a milder version, use a smaller amount and add a splash of honey to sweeten the heat.
The Umami Booster
Soy sauce is the silent hero that deepens flavor and provides a salty, savory backbone. Opt for low‑sodium soy sauce to keep the dish bright and let the shrimp shine. If you’re avoiding soy, try tamari or coconut aminos as a drop‑in replacement. Remember, the sauce should be silky, not watery, so add it after the shrimp are nearly done.
The Fresh Finish
Green onions add a pop of color, a mild onion flavor, and a fresh crunch. Slice them thinly so they melt into the sauce, releasing their aroma. They also help balance the heat from the chili paste. If you’re allergic to onions, scallions or chives work as a suitable substitute.
Everything's prepped? Good. Let's get into the real action…
The Method — Step by Step
- Prep the Base. While the shrimp are marinating, cook 2 cups of rice or your preferred noodles according to package instructions. Keep the rice warm on low heat to avoid drying out.
- Season the Shrimp. Pat the shrimp dry with a paper towel, then sprinkle with ½ teaspoon salt and ¼ teaspoon pepper. Let them sit for 5 minutes; this brings out their natural sweetness.
- Heat the Pan. Place a large non‑stick skillet over medium‑high heat and pour in 2 tablespoons olive oil. The oil should shimmer but not smoke.
- Sauté Aromatics. Add 4 minced garlic cloves and 1 tablespoon grated ginger. Stir constantly for 30 seconds until the mixture is fragrant—watch for the scent to turn from raw to toasted.
- Cook the Shrimp. Add the shrimp in a single layer. Let them sear for 1 minute on each side until they turn pink and opaque. Don’t overcrowd; if needed, cook in batches.
- Introduce the Heat. Reduce heat to medium and stir in 2 tablespoons chili paste. Let it bloom for 30 seconds, allowing the oils to release their flavor.
- Build the Sauce. Pour in 2 tablespoons soy sauce and a splash of water (about 2 tablespoons). Stir until the sauce thickens slightly and coats the shrimp.
- Finish the Dish. Return the shrimp to the pan and toss them in the sauce for another 30 seconds. The shrimp should be glossy and the sauce should cling to them.
- Plate. Spoon the cooked rice onto a bowl, top with the shrimp and sauce, and sprinkle with 3 sliced green onions.
- Serve Immediately. The dish is at its best when hot and fresh. Enjoy the burst of heat, the savory umami, and the bright green garnish all at once.
That's it — you did it. But hold on, I've got a few more tricks that'll take this to another level…
Insider Tricks for Flawless Results
The Temperature Rule Nobody Follows
Many cooks keep the heat low and end up with soggy shrimp. I always keep the skillet at medium‑high for the first 1–2 minutes, then reduce to medium for the sauce. This two‑step temperature strategy ensures the shrimp get a quick sear while the sauce thickens without burning.
Why Your Nose Knows Best
The aroma of garlic and ginger is the first indicator that the base is ready. If you can smell the garlic turning golden, the flavors have begun to develop. If it still smells raw, give it a minute longer. A good rule of thumb: when the aroma is intense but not burnt, you’re at the sweet spot.
The 5‑Minute Rest That Changes Everything
After cooking, let the shrimp rest for 2 minutes on a warm plate before serving. This allows the juices to redistribute, keeping the shrimp moist and flavorful. I’ve found that a quick rest also lets the sauce settle, making each bite more cohesive.
The Secret to a Silky Sauce
Add a splash of rice vinegar or a tiny pinch of sugar to balance the heat. This subtle sweet note cuts through the chili paste and prevents the sauce from becoming too sharp. It also adds a glossy sheen that makes the bowl look restaurant‑quality.
The Freshness Factor
Use the freshest shrimp you can find; they’re the star of the dish. Frozen shrimp works too, but thaw them fully and pat them dry to avoid excess water. If you’re using frozen, cook them on high heat for a quick sear to lock in flavor.
Creative Twists and Variations
This recipe is a playground. Here are some of my favorite ways to switch things up:
Coconut‑Creamy Variation
Swap the water in the sauce with half a cup of coconut milk. This gives the dish a silky, tropical twist that pairs beautifully with the heat. Serve over jasmine rice for a fragrant finish.
Mediterranean Touch
Add a handful of chopped kalamata olives and a squeeze of lemon juice. The briny olives add depth, while the lemon brightens the flavor profile. This version is perfect for a summer dinner with a side of roasted vegetables.
Spicy Peanut Sauce
Whisk 2 tablespoons of peanut butter with soy sauce, chili paste, and a splash of water. Toss the shrimp in this creamy sauce for a nutty, spicy bite. Garnish with chopped peanuts for crunch.
Vegetarian Swap
Replace shrimp with firm tofu or tempeh. Marinate in soy sauce and chili paste, then pan‑fry until golden. The tofu absorbs the sauce just as well, giving a satisfying, protein‑rich alternative.
Breakfast Edition
Serve the shrimp over scrambled eggs instead of rice. The eggs soak up the sauce, creating a savory, protein‑packed breakfast bowl that’s perfect for a weekend brunch.
Storing and Bringing It Back to Life
Fridge Storage
Cool the bowl to room temperature, then transfer to an airtight container. Store in the refrigerator for up to 2 days. The sauce may thicken, so add a splash of water or broth before reheating.
Freezer Friendly
Separate the shrimp from the sauce before freezing to prevent sogginess. Store shrimp in a freezer bag and sauce in a separate container. Reheat in the microwave for 2–3 minutes, stirring halfway through.
Best Reheating Method
Reheat the shrimp in a skillet over medium heat with a splash of water or broth. Stir until heated through. Add a tiny splash of water before reheating to restore moisture and steam the bowl back to perfection.