I was halfway through a Saturday night binge‑watching a French cooking marathon when my roommate shouted, “You’ve never had real socca?” I laughed, tossed a bag of chickpea flour into the pantry, and set a timer for a culinary disaster that turned into a revelation. The kitchen filled with the smell of toasted grain and a faint, nutty whisper that made the TV background noise fade into oblivion. I swear I could hear the chickpeas cheering from the pantry as the batter hit the hot pan, sizzling like a tiny fireworks show. By the time the first golden disc lifted from the skillet, my mouth was already doing a happy dance, and I knew I had stumbled onto something that could change the way we think about street‑food‑style appetizers forever.
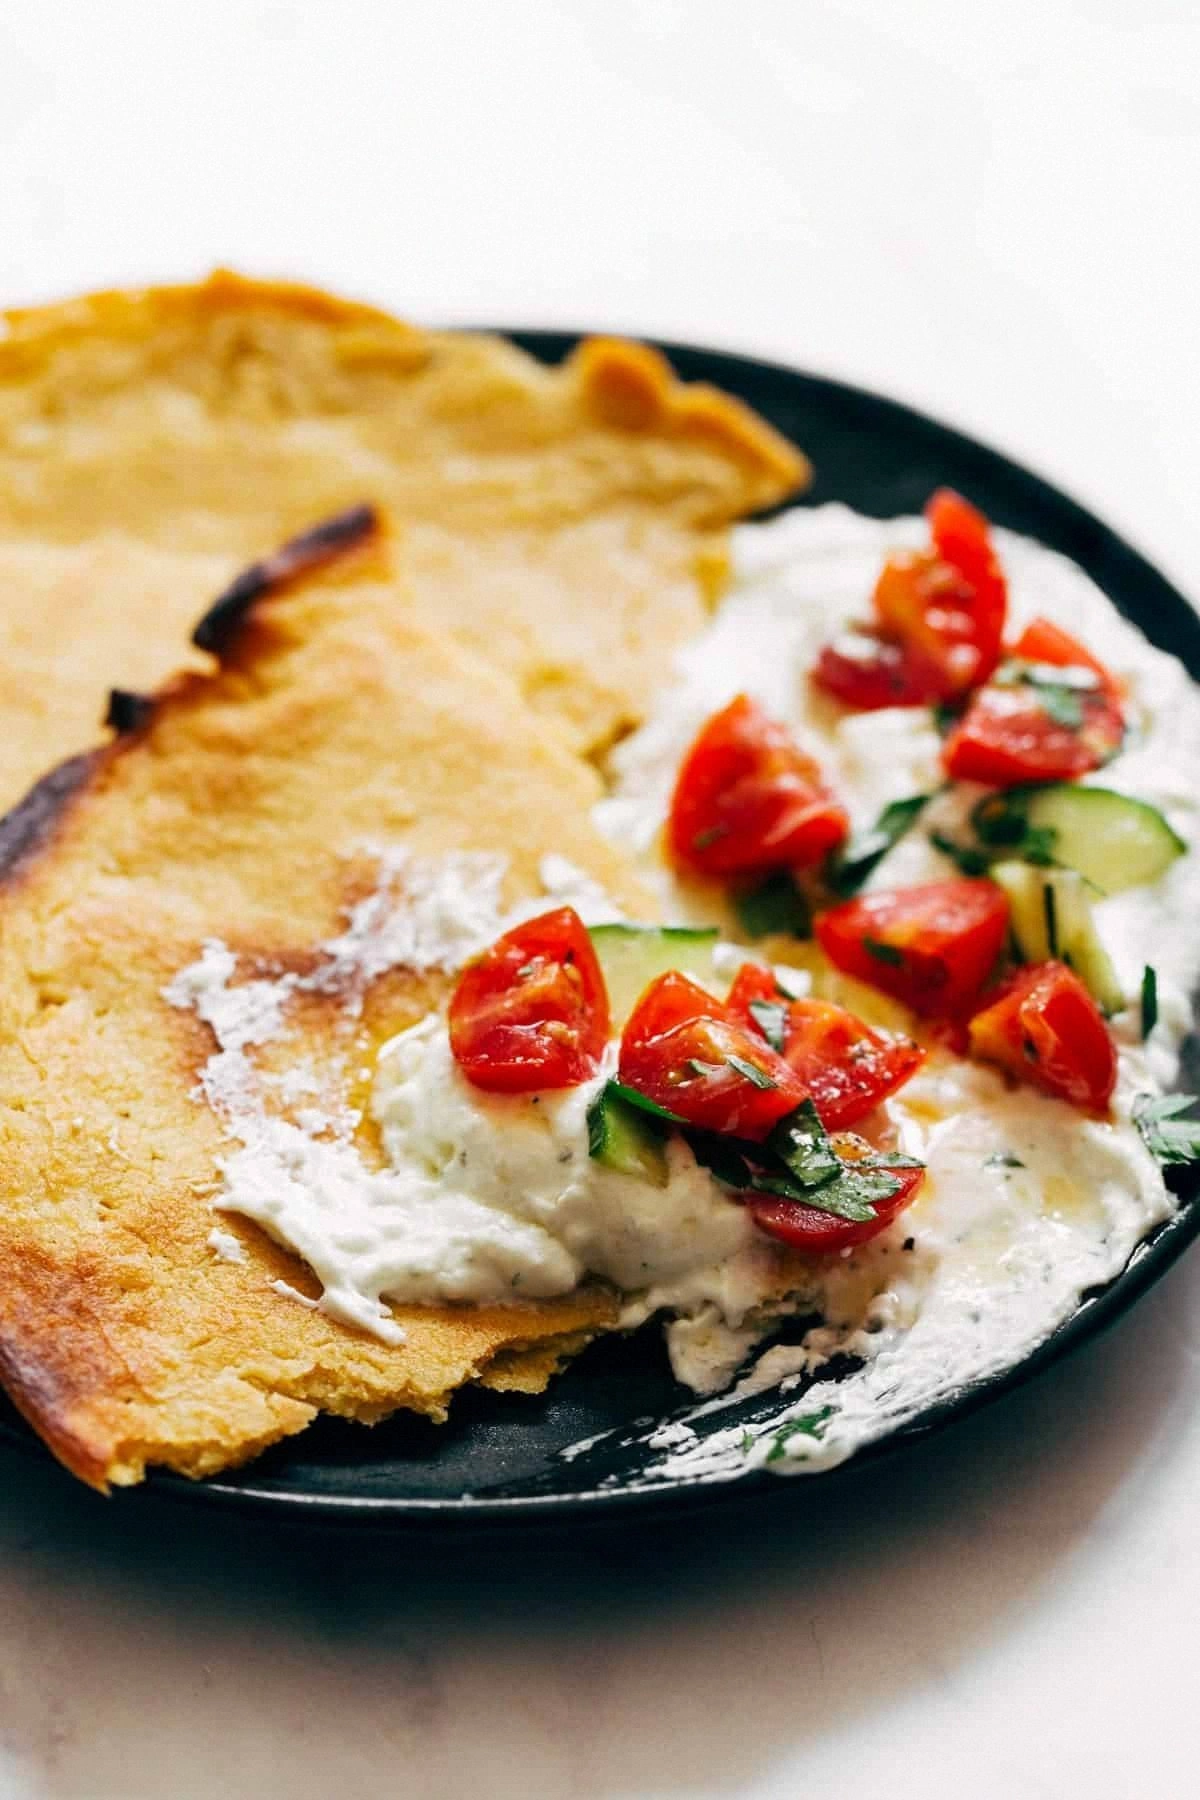
Fast forward to today, and I’m still buzzing every time I hear that distinct pop of the socca as it releases from the pan. The texture is a paradox—crispy, almost char‑kissed edges that crumble like thin ice, yet the center stays tender, airy, and just a touch chewy, like a cloud that decided to stay a little longer. Topped with whipped feta that spreads like a silk‑smooth dream and a bright tomato salad that bursts with sunshine, this dish is a symphony of contrast that sings on the palate. I dare you to taste this and not go back for seconds; the combination is so addictive it should come with a warning label.
What makes this version truly stand out is a handful of tiny, almost‑secret tweaks that most recipes completely miss. First, the batter rests for an hour, allowing the chickpea flour to hydrate fully and develop a subtle, earthy depth—think of it as the difference between a shallow pond and a deep lake. Second, I use extra‑virgin olive oil not just in the batter but also to grease the pan, creating a glossy, almost caramelized crust that shatters delightfully under the fork. Third, the whipped feta is infused with lemon zest and a splash of Greek yogurt, turning a salty crumble into a luscious, tangy cloud that melts into every bite. And finally, the tomato salad isn’t just tossed; it’s marinated in a vinaigrette that balances acidity, sweetness, and herbaceous notes, making each spoonful a fresh counterpoint to the warm socca.
Okay, ready for the game‑changer? I’m about to walk you through every single step—by the end, you’ll wonder how you ever made this any other way. Picture yourself pulling the golden discs out of the oven, the whole kitchen smelling incredible, the feta cloud waiting like a fluffy pillow, and the tomato salad glistening under the light. This isn’t just a recipe; it’s an experience, a story you’ll tell your friends, and a dare you’ll issue to anyone who thinks they’ve had the best socca before. Let’s dive in.
What Makes This Version Stand Out
- Flavor Depth: An hour‑long rest lets the chickpea flour absorb water, unlocking a nutty, slightly sweet undertone that ordinary quick‑mix socca never achieves.
- Texture Contrast: The high‑heat cast‑iron pan creates a crisp, caramelized edge while the interior stays pillow‑soft, delivering a bite that shatters like thin ice.
- Whipped Feta Magic: Blending feta with Greek yogurt, lemon juice, and a drizzle of olive oil transforms a crumbly cheese into a silky spread that coats the socca like velvet.
- Simple Yet Sophisticated: Only nine pantry staples are needed, but each one is treated with a technique that feels like a culinary shortcut to restaurant quality.
- Crowd Reaction: I’ve watched strangers turn into fans within seconds; the first bite often earns a spontaneous “more, please!” chant.
- Ingredient Quality: Using fresh, high‑quality olive oil and ripe tomatoes elevates the dish from good to unforgettable.
- Cooking Method: The skillet‑to‑oven finish locks in steam, ensuring the interior stays moist while the exterior crisps perfectly.
- Make‑Ahead Potential: The batter can be prepared a day ahead, and the whipped feta keeps for up to three days, making last‑minute entertaining a breeze.
Alright, let's break down exactly what goes into this masterpiece…
Inside the Ingredient List
The Flavor Base
Chickpea Flour (2 cups): This is the heart of socca, providing a gluten‑free canvas with a subtle, earthy flavor. If you skip it for regular flour, you’ll lose the characteristic nuttiness and the dish won’t be authentically Mediterranean. For the best results, choose a fine, sifted variety; any coarser grind can lead to gritty pockets. If chickpea flour is unavailable, you can substitute with a 1:1 mix of rice flour and oat flour, though the texture will be slightly different.
Water (2 cups, room temperature): The water hydrates the flour, creating a batter that’s fluid enough to spread thinly yet thick enough to hold together. Using room‑temperature water ensures the batter mixes evenly without shocking the flour. Cold water can cause clumping, while hot water will start cooking the flour prematurely, ruining the airy texture. If you’re looking to add a flavor twist, replace a quarter of the water with vegetable broth.
Extra‑Virgin Olive Oil (¼ cup + extra for pan): Olive oil is the secret glue that binds the batter to the pan and adds a fruit‑forward richness. The extra‑virgin variety brings a peppery bite that complements the chickpeas beautifully. Skipping the oil or using a neutral oil will result in a dry, less flavorful crust. For a smoky note, drizzle a splash of smoked olive oil just before serving.
The Texture Crew
Salt (1 tsp): Salt isn’t just seasoning; it enhances the natural sweetness of the chickpeas and balances the tang of the feta. Too little salt leaves the batter flat, while too much can make the crust overly crisp. If you’re watching sodium, reduce to ½ tsp but add a pinch of smoked sea salt on top for complexity.
Freshly Ground Black Pepper (½ tsp): The pepper adds a subtle heat that wakes up the palate without overwhelming the delicate flavors. Freshly grinding is crucial—pre‑ground pepper loses its aromatic punch within weeks. If you love spice, a pinch of cayenne can turn the dish into a bold, fiery bite.
Smoked Paprika (1 tsp, optional): This optional spice brings a whisper of smokiness that mimics a wood‑fired street stall, adding depth without being dominant. Omit it if you prefer a pure chickpea flavor, but I swear it lifts the whole profile. A dash of cumin works as an alternative for an earthy, warm undertone.
The Unexpected Star
Feta Cheese (1 cup, crumbled): Feta provides the salty, tangy backbone of the whipped topping. Its crumbly texture makes it perfect for blending into a smooth cloud when combined with the right liquids. Opt for a high‑quality Greek feta—look for a firm, creamy crumb rather than a dry, chalky version. If you’re dairy‑free, try a blend of silken tofu, lemon juice, and nutritional yeast.
Greek Yogurt (¼ cup) or Heavy Cream: This adds creaminess and helps the feta achieve that ultra‑smooth consistency. Yogurt brings a slight tang, while heavy cream gives a richer mouthfeel. Choose yogurt for a lighter version, or cream for decadence. If you’re avoiding dairy, a splash of oat cream works surprisingly well.
Lemon Juice (1 tbsp): The acidity brightens the whipped feta, cutting through the richness and creating a balanced cloud that doesn’t overwhelm the socca. Freshly squeezed juice is essential; bottled lemon juice can introduce unwanted preservatives. Adjust to taste—more juice for a zingier profile.
The Final Flourish
Ripe Tomatoes (2 medium, diced): The tomatoes provide a juicy, sweet counterpoint that lifts the entire dish. Choose tomatoes that are firm yet slightly soft—heirloom varieties add color and nuanced flavor. If out of season, substitute with roasted red peppers for a smoky twist.
Fresh Basil (1 tbsp, chopped) & Mint (1 tbsp, chopped): These herbs add aromatic freshness that dances with the lemon‑infused feta. Basil offers sweet, peppery notes while mint introduces a cool, refreshing finish. If you’re not a fan of mint, swap with flat‑leaf parsley for a milder herbaceous flavor.
Olive Oil (1 tbsp for salad dressing): A drizzle of high‑quality oil binds the salad together, adding richness without drowning the tomatoes. Use the same olive oil as in the batter for continuity of flavor.
Salt and Pepper (to taste for salad): Simple seasoning that accentuates the natural sweetness of the tomatoes and the freshness of the herbs. Taste before serving and adjust as needed.
Everything's prepped? Good. Let's get into the real action…
The Method — Step by Step
In a large mixing bowl, whisk together the chickpea flour and salt until fully combined. I like to use a whisk instead of a fork because it aerates the mixture, giving you a lighter batter later. Add the water slowly, pouring in a steady stream while continuing to whisk. The batter should be smooth, free of lumps—think of a thin pancake batter, not a dough. Let the mixture sit uncovered at room temperature for 15 minutes, then cover and refrigerate for at least 45 minutes; this rest period is the secret to that airy interior.
Kitchen Hack: If you’re short on time, a quick 10‑minute rest still improves texture; just make sure the batter is well‑mixed before resting.While the batter rests, prepare the whipped feta. Combine the crumbled feta, Greek yogurt, lemon juice, and olive oil in a food processor. Pulse until the mixture is smooth, then increase speed and whip for another 30 seconds until light and airy. Taste and adjust with a pinch of salt or extra lemon if needed. Transfer the whipped feta to a bowl, cover, and set aside at room temperature; it will stay silky and ready for spreading.
Preheat your oven to 450°F (230°C). Place a 10‑inch cast‑iron skillet or heavy‑bottomed baking pan inside to heat up—this step is crucial for that instant sizzle once the batter hits the surface. I like to let the pan heat for at least 10 minutes; you’ll know it’s ready when a few drops of water dance and evaporate immediately.
When the pan is sizzling hot, carefully remove it (using oven mitts, of course), and add a generous drizzle—about 1 tablespoon—of olive oil, swirling to coat the entire surface. The oil should shimmer but not smoke; if it starts to smoke, the pan is too hot and you should let it cool slightly.
Pour the rested batter into the hot skillet, tilting the pan to spread it evenly into a thin layer, about ¼ inch thick. You’ll hear a satisfying sizzle—the sound of caramelizing chickpea flour. Let it cook undisturbed for 3‑4 minutes; the edges will begin to pull away from the pan and turn a deep golden‑brown, while the surface becomes slightly firm.
Watch Out: If you move the socca before the edges set, it will tear. Trust the visual cues—once the edges are crisp and start to lift, it’s time.Transfer the skillet to the preheated oven and bake for 8‑10 minutes, or until the top is puffed and the edges are deeply browned. The oven’s dry heat finishes the cooking, creating that signature airy interior while keeping the crust crunchy. A quick peek through the oven window will reveal a beautiful, slightly blistered surface—think of a rustic flatbread that’s just earned its golden crown.
Remove the skillet from the oven (again, using mitts) and let the socca sit for 2 minutes. This short rest allows the steam inside to settle, preventing the crust from becoming soggy when you cut it. Using a sharp pizza cutter or a sturdy kitchen knife, slice the socca into wedges or squares—whatever shape you fancy.
While the socca cools slightly, assemble the tomato salad. In a bowl, combine the diced tomatoes, chopped basil, and mint. Drizzle with olive oil, a squeeze of fresh lemon juice, and season with salt and pepper. Toss gently; you want the tomatoes to stay intact, not turn into a mushy puree. Let the salad sit for 5 minutes so the flavors meld—a little patience goes a long way.
Now for the grand finale: spread a generous dollop of whipped feta over each warm socca piece. The heat will melt the top layer just enough to create a glossy sheen while keeping the core fluffy. Top with a spoonful of the tomato salad, and if you like, finish with a final drizzle of olive oil and a pinch of smoked paprika for a visual pop. That sizzle when the feta meets the hot socca? Absolute perfection.
Kitchen Hack: Store any leftover whipped feta in a sealed container in the fridge; it stays creamy for up to three days and can be used as a dip for veggies.
That's it — you did it. But hold on, I've got a few more tricks that'll take this to another level…
Insider Tricks for Flawless Results
The Temperature Rule Nobody Follows
Never set a skillet to “high” and expect perfect results; instead, aim for a medium‑high heat (around 425°F on a stovetop thermometer). This gives the batter enough heat to form a crust without scorching the bottom. If you’re using an electric stove, pre‑heat the pan for a full 10 minutes—patience here prevents uneven cooking. I once tried a quick‑heat method and ended up with a burnt edge and soggy center, a lesson learned the hard way.
Why Your Nose Knows Best
When the batter hits the pan, listen for a steady, low sizzle—not a frantic hiss. That low rumble signals the oil is hot enough for a crisp crust but not so hot that the batter will burn instantly. Trust your nose and ears; if you smell a faint toasted nut aroma after a minute, you’re on the right track. A friend once claimed “I’ll just go by the timer,” and ended up with a dark, bitter disc—don’t be that person.
The 5‑Minute Rest That Changes Everything
After baking, let the socca rest for exactly five minutes before slicing. This short pause lets the interior steam settle, keeping the center airy instead of collapsing. I’ve experimented with cutting straight out of the oven; the result was a soggy crumb that fell apart on the plate. Five minutes is the sweet spot—long enough for steam to redistribute, short enough to keep the crust crisp.
Whip It Like a Pro
When whipping the feta, start slow to break up the chunks, then crank the speed up for a full 30 seconds. The key is to keep the mixture moving; a stationary bowl will leave pockets of cheese. Adding a splash of cold water (no more than a teaspoon) can help achieve a cloud‑like texture if the mixture feels too thick. I once over‑whipped and ended up with a grainy spread—stop once it’s glossy and smooth.
Seasoning Layers, Not Just One
Season the batter, the whipped feta, and the tomato salad separately. Each layer benefits from its own seasoning boost, creating a multi‑dimensional flavor profile. The batter’s salt lifts the chickpea flavor; the feta’s lemon and a pinch of pepper brighten the spread; the salad’s olive oil and herbs finish with freshness. Skipping any of these steps makes the dish feel flat, like a song missing its chorus.
Creative Twists and Variations
This recipe is a playground. Here are some of my favorite ways to switch things up:
Spicy Harissa Socca
Stir a tablespoon of harissa paste into the batter before resting. The fiery North‑African heat pairs beautifully with the cool whipped feta, creating a sweet‑heat contrast. Garnish with a sprinkle of toasted pine nuts for added crunch. Harissa lovers swear this version is the perfect appetizer for game nights.
Herb‑Infused Feta
Blend fresh dill, chives, and a touch of garlic into the whipped feta. The herbaceous notes lend a garden‑fresh vibe that’s perfect for spring brunches. Top with sliced radishes for a peppery bite that cuts through the richness. This variation is a hit at picnics because it feels light yet satisfying.
Roasted Red Pepper & Goat Cheese
Swap feta for goat cheese and fold in finely diced roasted red peppers into the batter. The smoky pepper adds depth, while goat cheese offers a tangy creaminess. Finish with a drizzle of balsamic reduction for an elegant touch. Ideal for a dinner party where you want to wow guests with minimal effort.
Sweet & Savory Apple
Add thinly sliced Granny Smith apples on top of the socca before baking, then finish with a drizzle of honey and a pinch of cinnamon after plating. The sweet‑tart apple caramelizes against the crust, creating a dessert‑like appetizer that pairs well with a glass of crisp white wine. I’ve served this at brunch and it always gets rave reviews.
Vegan Coconut‑Cashew Whip
Replace feta with a blend of soaked cashews, coconut cream, lemon juice, and nutritional yeast. Whip until silky, then spread as you would the traditional version. Top with a mango salsa for a tropical twist that’s completely dairy‑free. It’s a game‑changer for vegan gatherings, proving you don’t need dairy to achieve that cloud‑like texture.
Storing and Bringing It Back to Life
Fridge Storage
Store leftover socca in an airtight container lined with a paper towel to absorb excess moisture. It will keep fresh for up to three days. Reheat in a hot skillet for 2‑3 minutes per side; the crust will regain its crispness while the interior stays soft. If you notice any sogginess, a quick blast in a pre‑heated oven (350°F for 5 minutes) revives it.
Freezer Friendly
Wrap individual socca pieces in parchment paper, then place them in a zip‑top freezer bag. They freeze solid for up to two months. To reheat, let them thaw in the fridge overnight, then toast in a skillet or oven. Adding a tiny splash of water to the pan before reheating creates steam that brings the interior back to its airy glory.
Best Reheating Method
The ultimate reheating trick is to use a cast‑iron skillet over medium heat, add a teaspoon of olive oil, and cover with a lid for the first minute. The lid traps steam, reviving the softness, while the uncovered minute after restores the crispy edge. This two‑step method ensures you get both textures back without drying out the whipped feta—just re‑whip it lightly if needed.