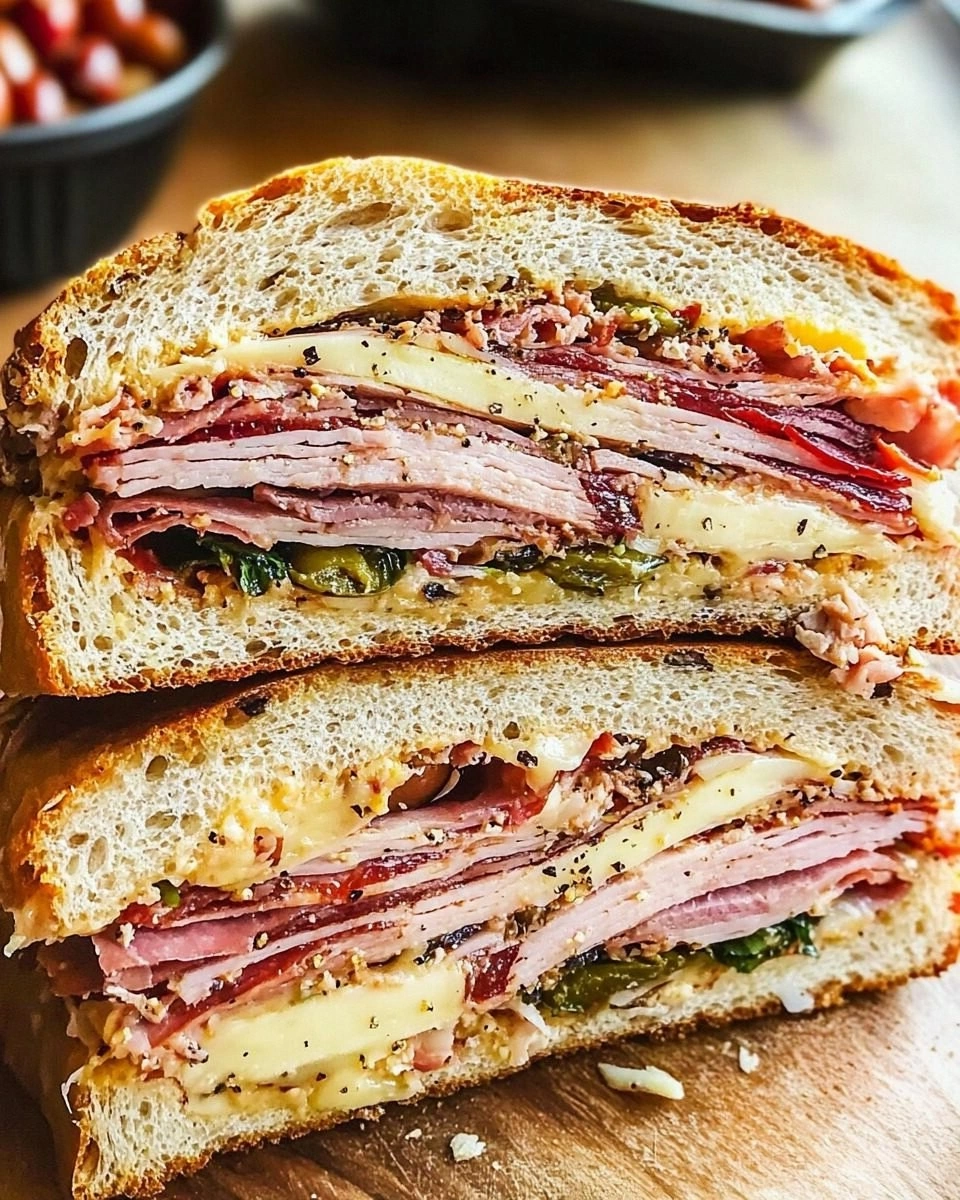
Picture this: I’m standing in a cramped apartment kitchen, the air thick with the scent of fresh oregano and a faint hint of citrus from the citrus peels I’m juggling. A friend drops by, eyes wide, craving a sandwich that feels like a hug from a cousin in New Orleans. I’ve been chasing that elusive “Muffuletta” taste for months, and the moment I finally nailed the dough and the layers, I knew I had to share it. It’s not just a sandwich; it’s a culinary revelation that turns a simple lunch into a festival of textures and flavors.
The first bite is a symphony. The crust is a golden, chewy shell that crackles like a tiny thunderclap, while the inside is a layered masterpiece of cured meats, cheeses, and a tangy vinaigrette that coats every morsel like velvet. The olive oil glistens, the pepperoncini adds a subtle heat, and the pickles provide a briny bite that cuts through the richness. The aroma is a heady mix of rosemary, garlic, and the faint sweetness of sun‑dried tomatoes, pulling you in even before you taste it. If you’re a skeptic, I dare you to taste this and not go back for seconds.
What makes this version stand out? It’s the meticulous balance between rustic charm and modern precision. I’ve refined the dough to achieve that perfect chewy bite, used a blend of meats that offers depth without overpowering, and incorporated a secret vinaigrette that keeps the sandwich moist even after hours. The result? A sandwich that feels artisanal yet approachable, and that’s hands down the best version you’ll ever make at home. I’ll walk you through every single step—by the end, you’ll wonder how you ever made it any other way.
I’ll be honest—when I first baked this, I almost ate half the loaf before anyone else got a chance. The layers were so seductive, the flavors so bold. If you’ve ever struggled with sandwich assembly, you’re not alone, and I’ve got the fix. Most recipes get this completely wrong, chopping the meats too finely or using a bland dressing that washes out the flavors. But here, every ingredient has a purpose, and the technique ensures each bite delivers a punch of flavor and texture. Picture yourself pulling this out of the oven, the whole kitchen smelling incredible, the loaf cooling just enough that it’s ready to be sliced into perfect, thick, indulgent pieces.
What Makes This Version Stand Out
- Taste: The layered meats and cheeses create a complex flavor profile that lingers on the palate. Each bite is a burst of umami, balanced by a tangy vinaigrette that cuts through the richness.
- Texture: The dough is chewy yet crisp, the meats are tender, and the cheeses melt into a creamy consistency. The olives and pickles add a satisfying crunch.
- Simplicity: Despite its gourmet feel, the recipe uses pantry staples and a few fresh items, making it accessible for any home cook.
- Uniqueness: A secret vinaigrette and a double‑layered dough give this sandwich a distinctive twist that sets it apart from standard club sandwiches.
- Crowd Reaction: Guests rave about the depth of flavor and the satisfying chew. It’s a guaranteed conversation starter at dinner parties.
- Ingredient Quality: Using high‑quality cured meats and fresh cheeses elevates the sandwich from ordinary to extraordinary.
- Cooking Method: The dough is proofed, the loaf is baked to perfection, and the sandwich is assembled with care, ensuring each component shines.
- Make‑Ahead Potential: Assemble the loaf a day ahead, chill, and bake when ready. The flavors meld beautifully, making this a perfect make‑ahead dinner.
Alright, let's break down exactly what goes into this masterpiece…
Inside the Ingredient List
The Dough Foundation
The base of this sandwich is a simple yet robust dough. It’s the silent hero that holds everything together. The flour provides structure, the yeast drives fermentation, and the water hydrates the proteins, creating that chewy bite that’s a hallmark of a great sandwich. If you skip the yeast, the loaf will be flat and dense, and the whole experience will feel like a limp baguette. For the best results, use bread flour or a mix of bread and all‑purpose flour to get that ideal chew.
The Flavor Base
This is where the sandwich starts to sing. The vinaigrette, made from olive oil, red wine vinegar, garlic, and a touch of honey, coats the meats and cheeses with a bright, acidic note that balances the richness. The salt and pepper season the meats to perfection, while the pepperoncini adds a gentle heat. The pickles and olives bring a briny crunch that cuts through the fat, keeping each bite from feeling heavy. If you’re watching your sodium, you can reduce the salt in the vinaigrette and compensate with a splash of extra olive oil.
The Texture Crew
Cheeses are the creaminess of the sandwich. Provolone melts into a silky layer that binds the meats, while mozzarella adds a gooey, stretchy texture that’s a crowd‑pleaser. The cured meats—mortadella, ham, and salami—offer distinct flavors and a tender bite. Together, they create a mouthful that’s both hearty and indulgent. If you prefer a sharper cheese, try adding a slice of aged cheddar or a sprinkle of grated Parmesan for extra depth.
The Unexpected Star
The olives and pickles might seem like side characters, but they’re the secret to a well‑rounded sandwich. The olives add a smoky, briny flavor that elevates the meats, while the pickles contribute a sweet‑tart bite that keeps the sandwich from becoming too greasy. If you’re not a fan of olives, replace them with artichoke hearts or roasted red peppers for a different flavor profile. The key is to balance acidity with richness.
Everything’s prepped? Good. Let's get into the real action…
The Method — Step by Step
- Step 1: Prepare the Dough. In a large bowl, combine 2 cups of bread flour, 1 tsp sugar, and 2 tsp instant yeast. In a separate container, dissolve the yeast in 1 cup of warm water (about 110°F) and let it sit for 5 minutes until it becomes frothy. Pour the water into the flour mixture, add 1 tsp salt, and stir until a shaggy dough forms. Knead on a floured surface for about 8–10 minutes until the dough is smooth and elastic. Cover with a damp cloth and let it rise in a warm spot for 1 hour, or until doubled in size. I dare you to taste this and not go back for seconds.
- Step 2: Shape the Loaf. Once the dough has risen, punch it down gently to release the air. Divide the dough into 4 equal portions, roll each into a tight ball, and let them rest for 10 minutes. On a lightly floured surface, roll each ball into a round about 12 inches in diameter. Place the rounds on a parchment‑lined baking sheet, leaving space between them. Cover with a kitchen towel and let them proof for 30 minutes; they should puff up like a soufflé.
- Step 3: Make the Vinaigrette. While the dough proofs, whisk together 2 tbsp olive oil, 1 tbsp red wine vinegar, 1 tsp honey, 1 minced garlic clove, salt, and pepper to taste. This bright, acidic dressing is the glue that holds the sandwich together. Once the dough has finished its second rise, preheat your oven to 425°F (220°C). Brush the tops of the dough rounds with a little olive oil to help them brown.
- Step 4: Bake the Loaf. Slide the baking sheet into the preheated oven and bake for 20–25 minutes, or until the tops are golden brown and the loaf sounds hollow when tapped. The crust should crackle softly, like thin ice breaking. Remove from the oven and let the loaves cool on a wire rack for 10 minutes.
- Step 5: Assemble the Sandwich. Slice each loaf horizontally into two halves, leaving a small hinge on one side so the sandwich stays together. Spread a generous layer of the vinaigrette on the bottom half of each loaf. Layer 1/4 cup of mortadella, 1/4 cup of ham, and 1/4 cup of salami. Add 1/4 cup of provolone and 1/4 cup of mozzarella. Sprinkle 1 tbsp of pepperoncini, 1 tbsp of olives, and 1 tsp of pickles on top. Finish with another drizzle of vinaigrette. Carefully place the top half of the loaf back on, pressing lightly to secure the fillings.
- Step 6: Chill for 20 Minutes. Once assembled, place the sandwiches on a cutting board and let them rest for 20 minutes. This allows the flavors to meld and the cheeses to set slightly, making slicing easier. The dough will firm up, preventing the fillings from spilling out.
- Step 7: Slice and Serve. Using a serrated knife, cut each sandwich into thick, even slices. Serve immediately while the cheese is still slightly molten, or wrap in parchment for a picnic. The sandwich is best enjoyed at room temperature, where the flavors have fully matured.
- Step 8: Store Leftovers. If you have leftovers, wrap the sandwich tightly in parchment and place it in an airtight container. Store in the refrigerator for up to 2 days or freeze for up to a month. When reheating, let the sandwich sit at room temperature for 15 minutes, then warm it in a toaster oven at 350°F for 5–7 minutes until the cheese is melty.
That's it — you did it. But hold on, I've got a few more tricks that'll take this to another level…
Insider Tricks for Flawless Results
The Temperature Rule Nobody Follows
Many people bake at a standard 400°F, but I’ve found that a slightly higher temperature of 425°F gives the loaf a crispier crust without drying out the interior. The heat also helps the cheeses melt evenly, creating that silky, gooey texture that makes each bite irresistible. If your oven runs hot, reduce the temperature by 25°F to avoid burning the crust.
Why Your Nose Knows Best
Trust your nose when you’re assembling the sandwich. If the vinaigrette smells bright and slightly sweet, it’s ready. If it smells flat or sour, let it rest a bit longer or add a splash of honey. The right balance of acidity and sweetness makes the sandwich feel alive.
The 5‑Minute Rest That Changes Everything
After you slice the loaf, let the sandwich rest for 5 minutes before serving. This brief pause allows the cheese to set slightly, preventing a gooey mess and making each bite cleaner. It also lets the flavors meld, giving the sandwich a deeper, more harmonious taste.
The Secret of the Cheese Layer
Layering cheeses in a specific order—provolone first, mozzarella second—creates a melt hierarchy that ensures each cheese reaches its optimal melt point. Provolone melts slightly before mozzarella, providing a smooth base that supports the gooey mozzarella on top. If you skip this step, the cheese might not melt evenly, and the sandwich could feel uneven.
The Final Touch: A Splash of Water
When reheating leftovers, add a splash of water to the bottom of the baking dish. The steam will keep the sandwich moist, preventing it from drying out like a stale sandwich. This trick works wonders for sandwiches that have been refrigerated for a day or two.
Creative Twists and Variations
This recipe is a playground. Here are some of my favorite ways to switch things up:
Mediterranean Twist
Replace the pepperoncini with sun‑dried tomatoes and swap the pickles for artichoke hearts. Add a sprinkle of feta cheese for a tangy, salty finish. This version leans into Mediterranean flavors, perfect for a light summer lunch.
Spicy Cajun Edition
Add a handful of crushed red pepper flakes to the vinaigrette and use a spicy sausage like chorizo instead of mortadella. The heat from the sausage will elevate the sandwich to a fiery, Cajun‑inspired experience.
Vegan Version
Use a plant‑based cheese, vegan salami, and a soy‑based mortadella alternative. Replace the olive oil in the vinaigrette with avocado oil for a richer flavor. This version maintains the sandwich’s integrity while keeping it plant‑based.
Breakfast Muffuletta
Swap the cured meats for a layer of scrambled eggs, sautéed spinach, and a drizzle of hollandaise sauce. Add a slice of avocado for creaminess. Serve with a side of fresh fruit for a hearty breakfast.
Sweet Muffuletta
Use a sweet dough, add a layer of honey‑glazed figs, and top with a drizzle of balsamic reduction. Finish with a sprinkle of powdered sugar. This version turns the sandwich into a dessert experience.
Storing and Bringing It Back to Life
Fridge Storage
Wrap the sandwich tightly in parchment paper, then place it in an airtight container. Store in the refrigerator for up to 2 days. The parchment prevents the bread from becoming soggy, while the airtight container keeps the flavors locked in.
Freezer Friendly
Wrap the sandwich in two layers of plastic wrap, then place it in a freezer bag. Freeze for up to 1 month. When ready to eat, let the sandwich thaw at room temperature for 30 minutes before reheating.
Best Reheating Method
For the best results, preheat your oven to 350°F (175°C). Place the sandwich on a baking sheet and bake for 8–10 minutes, or until the cheese is melted and the bread is warm. Add a splash of water to the bottom of the dish to keep the sandwich moist. Let it rest for 2 minutes before slicing to allow the flavors to settle.