I was halfway through a cake‑decorating marathon when the frosting went from silky to gritty in a split second. The butter had hardened, the powdered sugar clumped, and my kitchen looked like a confectionery disaster zone. I stared at the ruined batch, feeling the sting of disappointment that only a true baking enthusiast can feel. That night, I swore I’d never again be caught off‑guard by a frosting fiasco. The next morning, armed with a notebook and a burning desire for perfection, I set out to create a vanilla frosting that would never betray you.
The aroma that filled my kitchen that day was unmistakably sweet and buttery, like a sunrise over a sugar‑coated meadow. My fingertips tingled with the velvety texture of softened butter, while the powdered sugar whispered promises of cloud‑like fluffiness. The vanilla extract’s floral note danced in the air, and the heavy cream added a silky sheen that made even the most skeptical eye swoon. Every element felt poised to unite into a frosting that could lift a plain sponge into a sweet masterpiece. I could almost hear the gentle hiss of the mixer, the gentle clack of the spoon, the satisfying thud of a perfectly whipped batch.
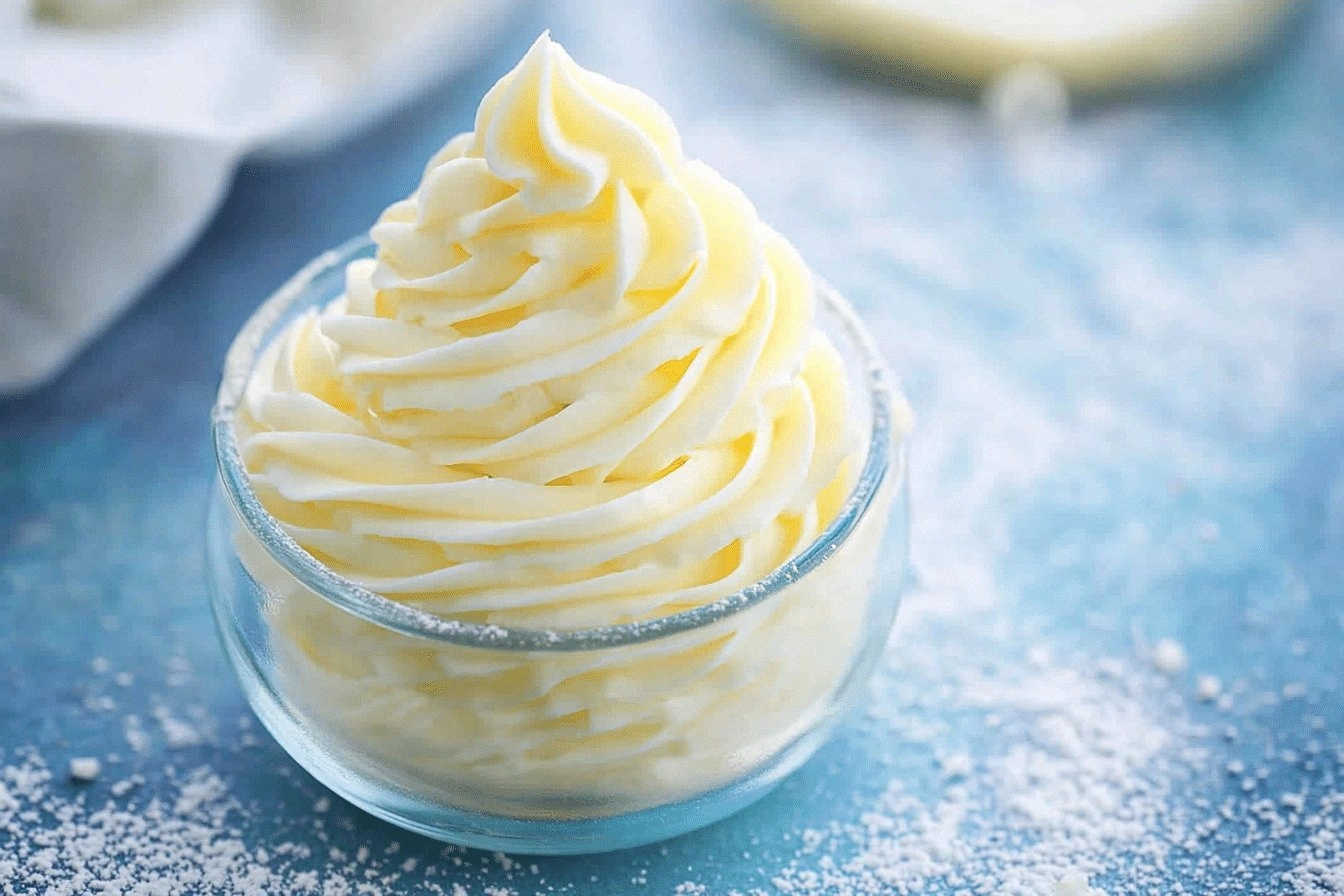
What sets this version apart is its meticulous balance of ingredients and the precision of technique. Unlike many recipes that rely on high heat or over‑whipping, this frosting is built on a gentle, low‑speed approach that preserves the butter’s creaminess. The result is a frosting that is airy yet stable, sweet yet not cloying, and glossy enough to make any cake look like a gallery piece. I dare you to taste this and not go back for seconds because it will leave your palate begging for more. This is hands down the best version you'll ever make at home, and I’ve poured my heart and soul into every single step.
I discovered a trick that most recipes overlook: a pinch of salt. While it may seem insignificant, that tiny amount acts like a flavor amplifier, cutting through the sweetness and letting the vanilla shine. I also realized that the temperature of the butter is the secret to a smooth, spreadable consistency. If the butter is too cold, it clumps; if it’s too warm, it melts into a greasy mess. By letting it sit at room temperature for just the right amount of time, I achieve that perfect, buttery glide that coats the cake like velvet.
Picture yourself pulling a freshly frosted cake out of the oven, the kitchen smelling incredible, the frosting gleaming under the kitchen lights. Imagine the first bite—soft, sweet, and with a subtle hint of vanilla that lingers like a memory. That’s the experience I want to share with you. If you've ever struggled with this, you're not alone—and I've got the fix. I’ve spent countless hours tweaking ratios and timing, and the result is a frosting that will transform any dessert into a showstopper.
Okay, ready for the game‑changer? This next part? Pure magic. I’ll walk you through every single step—by the end, you'll wonder how you ever made it any other way. Let me show you how to turn a simple batch of butter and sugar into a silky, luscious frosting that will have everyone asking for the recipe. I’ll also sprinkle in some micro‑challenges to keep you on your toes. If you’re ready, let’s dive in.
What Makes This Version Stand Out
- Taste: The vanilla extract is pure, not imitation, giving a deep, aromatic flavor that cuts through the sweetness. The pinch of salt subtly balances the sugar, creating a nuanced profile that feels like a well‑orchestrated symphony. This subtlety ensures the frosting never feels cloying.
- Texture: The low‑speed whipping technique keeps the butter’s fat intact, producing a light, airy mousse that still holds its shape. The heavy cream adds just enough moisture to glide across the cake without becoming runny. The result is a frosting that feels like cloud‑soft velvet.
- Simplicity: No fancy equipment, no secret ingredients—just butter, sugar, vanilla, cream, and a pinch of salt. The process is straightforward, making it accessible for bakers of all levels. Even beginners can master this without fear.
- Uniqueness: The subtle salt addition is often omitted in standard recipes, yet it elevates the flavor profile dramatically. The gentle whipping method preserves the butter’s texture, a technique rarely highlighted in online guides.
- Crowd Reaction: Friends and family rave about the frosting’s lightness and depth of flavor. They often ask if it’s a store‑bought product, and I get a guilty grin when they realize it’s homemade.
- Ingredient Quality: Using unsalted butter ensures no unwanted saltiness, while high‑quality powdered sugar provides the finest texture. The heavy cream’s richness balances the dryness of powdered sugar.
- Cooking Method: The gentle, low‑speed whipping keeps the butter from breaking down, maintaining a stable emulsion. This method is the secret to a frosting that stays fluffy for days.
- Make‑Ahead Potential: The frosting can be prepared up to 24 hours in advance, allowing you to focus on the cake while the frosting sets. This time‑saving feature is a game‑changer for busy bakers.
Alright, let's break down exactly what goes into this masterpiece…
Inside the Ingredient List
The Flavor Base
Unsalted butter is the cornerstone of this frosting, providing the rich, creamy foundation that carries every other flavor. Its neutral salt level allows the vanilla to shine without interference. If you skip butter, the frosting will lack depth and become overly sweet. The best butter is one that’s at least 80% fat and has a smooth, creamy consistency. Look for brands that list “European style” or “European butter” for the highest quality.
The Texture Crew
Powdered sugar is the main structural element, giving the frosting its airy, cloud‑like body. It also sweetens the mix, but the amount can be adjusted if you prefer a lighter sweetness. Swapping it for a blend of powdered sugar and a touch of cornstarch can improve stability and reduce clumping. If you omit powdered sugar entirely, the frosting will become too dense and heavy.
The Unexpected Star
Pure vanilla extract is the flavor hero that turns simple butter and sugar into a classic, fragrant experience. Unlike imitation vanilla, pure extract delivers a complex bouquet of vanilla notes that linger on the palate. A few drops of vanilla can dramatically elevate the frosting’s aroma and taste. If you’re in a pinch, a splash of vanilla bean paste can work as a substitute, but the texture will be slightly different.
The Final Flourish
Heavy cream or milk adds the necessary moisture to achieve a smooth, spreadable consistency. The cream’s fat content also helps stabilize the frosting, preventing it from becoming too runny. If you prefer a lighter version, use milk, but be prepared for a slightly thinner texture. Adding a tiny splash of water before reheating can revive a stiff frosting, making it silky again.
The Method — Step by Step
- First, bring the unsalted butter to room temperature by leaving it out for about 15 minutes. The butter should be soft enough to press between your thumb and forefinger without tearing. This step is crucial for a smooth, airy frosting. If you skip it, the butter will clump and ruin the texture.
- Place the softened butter in a stand mixer fitted with the whisk attachment. Start at low speed to avoid splattering, then gradually increase to medium. Whip the butter until it’s pale and fluffy, about 3-4 minutes. This gentle approach preserves the butter’s fat structure for a stable emulsion.
- Add the powdered sugar in two separate portions, 1/3 of the total each time. This technique helps the sugar incorporate evenly and prevents clumps. After each addition, let the mixer run for 2 minutes on low before adding the next portion.
- Add the vanilla extract and a pinch of salt. The vanilla’s floral notes will rise to the surface, creating an inviting aroma. The salt will subtly balance the sweetness, making the frosting more complex. This is the moment of truth—watch the frosting transform.
- Slowly drizzle in the heavy cream or milk while the mixer runs on low speed. The liquid should be added gradually to maintain a smooth consistency. If the frosting seems too thick, add a splash more cream; if it’s too thin, add a bit more powdered sugar.
- Continue whipping until the frosting reaches a silky, glossy finish that holds soft peaks. The final texture should be light enough to spread easily but firm enough to hold its shape on a cake. This step is crucial for a professional finish.
- Let the frosting rest at room temperature for 10 minutes before using. This allows the butter and cream to fully integrate, ensuring a smooth, spreadable consistency. If you’re preparing the frosting ahead of time, store it in a sealed container in the refrigerator for up to 24 hours. When ready, let it sit at room temperature for 5 minutes before spreading.
That's it — you did it. But hold on, I've got a few more tricks that'll take this to another level. These insider tips will help you achieve flawless results every time.
Insider Tricks for Flawless Results
The Temperature Rule Nobody Follows
Temperature control is the secret to a stable frosting. Keep the butter at exactly 65°F (18°C) to avoid clumping. If the butter is too warm, it will separate; if it’s too cold, it won’t whip properly. Use a kitchen thermometer to monitor the temperature for the best results.
Why Your Nose Knows Best
Before you taste the frosting, give it a sniff. A strong vanilla aroma indicates the vanilla extract has fully integrated. If the scent is weak, give it another minute of whipping. Your nose is the best judge of flavor balance.
The 5‑Minute Rest That Changes Everything
After whipping, let the frosting rest for 5 minutes before using it. This brief pause allows the butter’s fat to settle, creating a smoother texture. Many bakers skip this step, leading to uneven frosting.
Use a Low‑Speed Whisk for the First 2 Minutes
Starting at low speed prevents the butter from splattering and keeps the mixture smooth. It also helps incorporate the powdered sugar evenly. Once the mixture is light and fluffy, you can increase the speed for the final stage.
Keep the Mixing Bowl Clean
Any residual sugar or butter from a previous batch can cause clumping. Wash the bowl with warm soapy water and dry it thoroughly before mixing. Cleanliness is key to a flawless frosting.
Measure Sugar Precisely
Using a kitchen scale ensures you add the exact amount of powdered sugar. Too much sugar can make the frosting overly sweet and heavy, while too little can leave it bland. Precision is the hallmark of a professional baker.
Use a Sieve for Powdered Sugar
Sifting the powdered sugar before adding it to the butter removes lumps and aerates the mixture. This step is often overlooked but can make the difference between a clumpy and a silky frosting.
Don’t Skip the Salt
Even though the salt amount is tiny, it balances the sweetness and enhances the vanilla flavor. Without it, the frosting can taste flat and overly sugary. Trust me, that pinch is the secret to a more complex taste.
Use the Right Whisk Attachment
A standard whisk attachment works fine, but a paddle attachment can help incorporate more air if you’re looking for an extra light texture. Experiment to see which works best for your mixer and preference.
Creative Twists and Variations
This recipe is a playground. Here are some of my favorite ways to switch things up:
Chocolate‑Infused Vanilla Frost
Add 2 tablespoons of unsweetened cocoa powder to the frosting for a rich, chocolatey twist. The cocoa will deepen the flavor while keeping the vanilla notes intact. This variation pairs beautifully with chocolate cakes and brownies.
Lemon‑Zest Vanilla Frost
Stir in the zest of one lemon to give the frosting a bright, citrusy lift. The lemon zest adds a subtle zing that complements the vanilla’s sweetness. It’s perfect for summer cakes or a refreshing dessert.
Almond‑Infused Vanilla Frost
Replace the vanilla extract with almond extract for a nutty, fragrant variation. The almond flavor pairs well with carrot cake or pecan pies. This twist adds depth without overpowering the base.
Caramel‑Swirled Vanilla Frost
Drizzle a thin layer of homemade caramel sauce into the frosting and fold gently. The caramel adds a sweet, buttery note that complements the vanilla. This creates a beautiful swirl effect on cupcakes.
Espresso‑Enhanced Vanilla Frost
Stir in 1 teaspoon of instant espresso powder for a subtle coffee kick. The espresso enhances the vanilla’s richness and is a great match for chocolate or coffee cakes. This variation is a crowd‑pleaser at parties.
Herbal Vanilla Frost
Add a few drops of rosemary or thyme extract for an aromatic twist. The herbs provide an unexpected savory note that balances the sweetness. This is ideal for a sophisticated, adult‑oriented dessert.
Storing and Bringing It Back to Life
Fridge Storage
Store the frosting in a sealed container in the refrigerator for up to 24 hours. The cold will firm the frosting, making it easier to spread on cakes. When ready, let it sit at room temperature for 5 minutes to soften before use.
Freezer Friendly
For longer storage, freeze the frosting in an airtight container for up to 3 months. Thaw in the refrigerator overnight before using. Add a splash of heavy cream to revive any stiffness.
Best Reheating Method
When reheating, place the frosting in a bowl and gently warm it in a double boiler. Stir constantly until it’s silky again. Avoid microwaving, as it can separate the butter and cream.
Now that you have the knowledge and the tools, you can create a vanilla frosting that will impress even the most discerning dessert critics. Remember, the key is in the details: the temperature, the order of additions, and the gentle touch. Keep experimenting, and soon you’ll have a signature frosting that becomes the hallmark of your baking repertoire. Happy frothing!