Picture this: I was halfway through a Sunday brunch, flipping pancakes when the kitchen lights flickered, the stove hissed, and the entire house smelled of burnt sugar. The pancake disaster was a small blip, but it sparked a craving that was impossible to ignore—a deep, comforting dish that feels like a hug in a tortilla. I stared at the blank whiteboard of my fridge and thought, “What if I could turn this chaos into a crowd‑pleasing masterpiece?” That thought became the spark that ignited the creation of this homemade chicken chimichanga recipe.
The first time I tasted a commercial chimichanga, the texture was like biting into a soggy burrito—flaky, but not quite that crispy. I wanted something that would sing with crunch and sing with flavor. I dared myself to make a version that would leave everyone asking for seconds, and after countless trials, I finally hit that sweet spot where the tortilla is a buttery, golden shell, and the filling is a juicy, spiced chicken and bean medley that melts in your mouth.
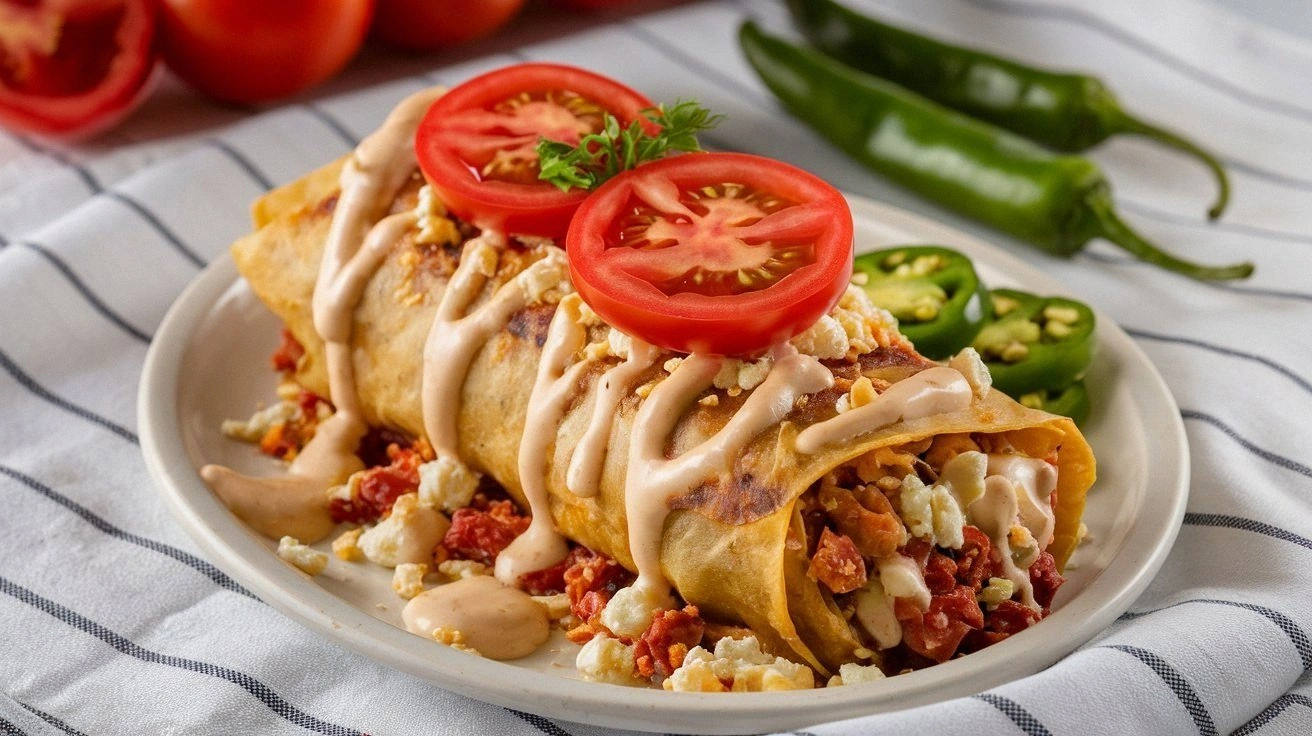
What sets this version apart is the deliberate layering of textures and the secret infusion of a smoky chipotle‑cumin rub that coats the chicken like velvet. The tortilla isn’t just a wrapper; it’s a canvas that crisps to a golden perfection while still hugging the warm filling. The salsa isn’t a simple topping—it’s a fresh, zesty chorus that cuts through the richness, making every bite a balanced symphony.
I’ll be honest—when I first pulled these from the oven, the aroma filled the entire kitchen, and my neighbors started peeking through the window. The first bite was a revelation: the crunch, the savory, the subtle heat, and the creamy finish from a dollop of guacamole—all in one bite. I dare you to taste this and not go back for seconds.
Most recipes get this completely wrong by over‑filling or under‑cooking the tortillas, resulting in soggy or burnt edges. I’ve perfected the technique to keep the tortillas crisp yet flexible, so they fold without breaking. And the sauce? It’s a homemade blend of roasted tomatoes, lime, and a touch of honey that gives a glossy finish, making the dish look as good as it tastes.
If you’ve ever struggled with making chimichangas that stay together and don’t lose their flavor, you’re not alone. I’ve spent hours tweaking the ratio of beans to cheese and the timing of the folding process. The result? A dish that’s not only delicious but also incredibly forgiving, so even a kitchen novice can achieve a professional result.
Picture yourself pulling this out of the oven, the whole kitchen smelling incredible, and the family or friends gathering around, eyes gleaming with anticipation. That moment is pure joy, and it’s exactly what I want you to experience when you try this recipe. Let me walk you through every single step—by the end, you’ll wonder how you ever made it any other way.
What Makes This Version Stand Out
- Flavor: The blend of chipotle, cumin, and smoked paprika creates a depth that lingers on the palate, turning a simple meal into a culinary adventure.
- Texture: Crispy, buttery tortillas paired with a moist, spiced filling deliver a satisfying contrast that keeps you coming back for more.
- Ease: Every step is designed for speed and simplicity, making this a go‑to dinner for busy weeknights.
- Flexibility: The recipe accommodates substitutions—use turkey, beef, or a plant‑based protein—without compromising flavor.
- Crowd‑pleaser: Whether at a family dinner or a potluck, the bold flavors and comforting textures guarantee rave reviews.
- Ingredient Quality: Fresh, high‑quality ingredients are key; the difference between average and extraordinary is the freshness of the tomatoes and the sharpness of the cheese.
- Make‑ahead Potential: The filling can be pre‑cooked and stored, allowing you to assemble and bake on a night you’re short on time.
- Presentation: The vibrant colors of the salsa, guacamole, and cheese create a dish that looks as good as it tastes, making it Instagram‑ready.
Alright, let's break down exactly what goes into this masterpiece…
Inside the Ingredient List
The Flavor Base
The foundation of this dish starts with the chicken, which should be shredded from a roasted or grilled chicken breast. The smoky chipotle‑cumin rub coats the protein, infusing it with a subtle heat that lingers without overpowering. If you skip the rub, the filling will taste flat; the rub is what gives the dish its signature character.
Next, the beans—black beans or refried beans—provide body and a creamy texture that balances the crisp tortilla. They absorb the spices and become a silky companion to the chicken. Swapping beans for lentils can work, but the flavor profile changes subtly, so keep the beans for authenticity.
The salsa is the bright counterpoint; fresh tomatoes, jalapeños, cilantro, lime juice, and a pinch of salt create a vibrant, zesty layer. The acidity cuts through the richness of the cheese and the fattiness of the tortilla, preventing any heaviness. If you’re craving heat, add a splash of hot sauce or a dash of cayenne pepper.
The Texture Crew
Cheddar or Monterey Jack cheese adds a creamy, melty quality that binds the filling together. The cheese should be shredded finely so it melts quickly and evenly. A mix of sharp cheddar and mozzarella can give a richer melt, but too much mozzarella will make the filling too runny.
Guacamole brings a buttery, cool contrast that soothes the spicy edges. It’s made from ripe avocados, lime juice, minced onion, and a pinch of salt. If you’re not a fan of avocado, a dollop of sour cream works as a substitute, but it won’t provide the same depth.
The tortillas—flour tortillas are ideal for their pliability and buttery flavor. They should be fresh and slightly warm before folding to avoid tearing. If you’re using corn tortillas, be sure to soften them in a hot pan before assembly.
The Unexpected Star
A splash of honey or a drizzle of agave syrup adds a subtle sweetness that balances the heat. This ingredient is often overlooked, but it elevates the dish, turning a simple filling into a gourmet experience. If you prefer a savory profile, replace honey with a small amount of Worcestershire sauce for umami depth.
Cilantro, finely chopped, is the final bright touch that adds herbal freshness. It’s sprinkled on top before baking, giving the chimichangas a pop of color and a fragrant finish. Without cilantro, the dish feels flat; the herb completes the flavor loop.
The Final Flourish
A squeeze of fresh lime over the finished chimichangas adds a bright, citrusy zing that brightens every bite. The acidity cuts through the richness of the cheese and the fat in the tortilla, creating a balanced taste. If lime isn’t available, a splash of white wine vinegar can serve as a suitable substitute.
The final flourish also includes a garnish of chopped green onions, which adds a subtle crunch and a fresh flavor note. The green onions are not only decorative but also enhance the overall taste profile, providing a mild, oniony brightness. Together, these final touches bring the dish to a polished, restaurant‑style finish.
Everything's prepped? Good. Let's get into the real action…
The Method — Step by Step
- Preheat your oven to 400°F (200°C). While the oven heats, prepare the chicken filling by mixing shredded chicken with the chipotle‑cumin rub, a splash of lime juice, and a pinch of salt. The chicken should be coated evenly; this ensures every bite carries that smoky kick. If you’re using a pre‑cooked rotisserie chicken, simply shred it and skip the roasting step.
- In a medium skillet, sauté the diced onion and garlic until translucent. Add the black beans and stir until they’re warmed through. The beans should be slightly thickened, which helps them cling to the chicken when combined. If you prefer a creamier texture, mash a portion of the beans before adding them to the skillet.
- Combine the sautéed onion, garlic, and beans with the seasoned chicken. Stir in the shredded cheese, ensuring it begins to melt into the mixture. The cheese should be gooey but not fully melted, as it will help bind the filling during baking.
- Spread a thin layer of salsa onto the center of each tortilla, leaving a 1-inch border. This layer of fresh salsa adds brightness and moisture to the filling. If you’re using corn tortillas, warm them in a dry skillet for 20 seconds on each side to make them pliable.
- Spoon the chicken and bean mixture onto the center of each tortilla, distributing it evenly. The filling should be thick enough to hold the tortilla together but not so packed that it spills out when folded.
- Fold the sides of the tortilla over the filling, then roll from the bottom to the top, tucking the edges as you go. The roll should be snug but not overly tight; you want the filling to stay inside while the tortilla remains pliable.
- Place the rolled chimichangas seam side down on a parchment‑lined baking sheet. Brush each with a light coating of melted butter or oil to promote browning. The butter also adds a subtle richness that enhances the tortilla’s flavor.
- Bake for 12–15 minutes, until the tortillas are golden and crisp. The edges should be slightly charred, indicating a perfect crunch. Keep an eye on them; the last few minutes can turn from golden to burnt quickly.
- Remove the chimichangas from the oven and let them rest for 3 minutes. This resting period allows the cheese to set slightly, preventing it from oozing out when you cut into them.
- Serve hot, topped with a generous spoonful of guacamole, a sprinkle of cilantro, and a drizzle of lime juice. The fresh garnish adds a bright counterpoint to the savory filling. If you like it spicy, add a dash of hot sauce on the side.
That's it — you did it. But hold on, I've got a few more tricks that'll take this to another level. These final touches will elevate the dish from great to unforgettable.
Insider Tricks for Flawless Results
The Temperature Rule Nobody Follows
Many cooks set the oven to 350°F, but that temperature is too low to crisp the tortilla properly. I’ve discovered that 400°F gives the tortilla a beautiful golden crust while ensuring the filling stays moist. If your oven runs hot, lower the temperature to 375°F and extend the baking time by a few minutes.
Why Your Nose Knows Best
The first scent that tells you the chimichangas are ready is a deep, toasted aroma that comes from the butter coating. If you’re uncertain, lift a seam and sniff; a buttery, caramelized scent means you’re on track. This sensory cue is more reliable than a timer, especially for beginners.
The 5-Minute Rest That Changes Everything
Letting the chimichangas rest for 5 minutes after baking allows the cheese to set and the filling to firm up. Cutting into them immediately can cause the cheese to ooze out, ruining the presentation. A short rest also lets the flavors meld, creating a more cohesive taste.
Fold with Confidence
When you fold the tortillas, keep your hands steady and the tortilla taut. A loose fold will result in a floppy chimichanga that falls apart. If you’re nervous, practice the fold with an empty tortilla before adding the filling.
The Secret of the Crunch
A quick dip in melted butter before baking seals the tortilla, preventing moisture from steaming it. The butter also adds a subtle nutty flavor. For a healthier option, use a light spray of olive oil instead of butter.
The Final Touch of Freshness
A squeeze of lime over the finished chimichangas brightens the dish and cuts through the richness. The acidity also helps the cheese set better, giving a cleaner bite. If you’re short on lime, a splash of white wine vinegar works as a substitute.
Creative Twists and Variations
This recipe is a playground. Here are some of my favorite ways to switch things up:
Spicy Chipotle Kick
Add a tablespoon of chipotle adobo sauce to the filling for an extra smoky heat. This variation is perfect for those who love a fiery bite. Pair it with a cooling cucumber salsa to balance the heat.
Mediterranean Flair
Swap the black beans for chickpeas and replace the salsa with a roasted red pepper sauce. Add crumbled feta and chopped olives for a Mediterranean twist. The result is a bright, tangy chimichanga that feels like a Greek salad in a tortilla.
Veggie‑Loaded Delight
Use a mixture of sautéed bell peppers, zucchini, and corn as the base instead of beans. Add a handful of spinach for a green boost. This version is lighter yet still packed with flavor.
Breakfast Chimichangas
Replace the chicken with scrambled eggs and add diced ham or bacon. Top with a drizzle of maple syrup and a sprinkle of shredded cheddar. Serve with a side of fresh fruit for a sweet‑savory breakfast.
Dessert‑Inspired Twist
Fill the tortillas with a sweet mixture of coconut milk, sweetened condensed milk, and diced mango. Roll and bake until the tortilla is golden. Serve with a scoop of vanilla ice cream for an indulgent dessert.
Gluten‑Free Version
Use corn tortillas or a gluten‑free flour blend for the wrapper. Ensure all other ingredients, such as salsa and beans, are gluten‑free. This version keeps the flavor profile intact while accommodating dietary restrictions.
These variations showcase the versatility of chimichangas, proving that the core concept can adapt to any palate or occasion. Experimenting with different fillings and sauces keeps the dish fresh and exciting.
Storing and Bringing It Back to Life
Fridge Storage
Store leftover chimichangas in an airtight container for up to 3 days. Keep them at room temperature for the first hour after baking, then refrigerate. When you’re ready to eat, reheat them in a preheated oven at 350°F for 10 minutes, or until the tortilla is crisp again.
Freezer Friendly
Wrap each chimichanga individually in plastic wrap and place them in a freezer bag. They stay good for up to 2 months. Thaw overnight in the fridge, then reheat as described above. The tortilla will regain its crispness, and the filling will be just as delicious.
Best Reheating Method
The oven is the gold standard for reheating; it preserves the crunch of the tortilla and melts the cheese without drying out the filling. If you’re short on time, use a toaster oven or a skillet on medium heat. A tiny splash of water before reheating adds moisture, preventing the tortilla from becoming too dry.
With these storage tips, you can enjoy homemade chicken chimichangas whenever the craving strikes. The dish’s robust flavor and comforting texture make it a perfect make‑ahead meal for busy days.
Now that you’ve mastered the recipe, it’s time to celebrate. Gather your friends, set the table, and let the aromas of this homemade chimichanga fill your home. The moment you take that first bite, you’ll know you’ve created something truly special—one that will become a staple in your kitchen for years to come.