Picture this: you’re in the middle of a frantic Halloween prep, the kitchen smells like burnt caramel and you’ve just realized the cookie sheet is empty. Your friend, armed with a dare, challenges you to create a monster‑themed dessert that’s both terrifying and utterly irresistible. I rolled up my sleeves, grabbed my trusty saucepan, and decided that the only way to win this culinary showdown was to turn the classic chocolate cake into a monstrous delight that will haunt your taste buds forever. This isn’t just a cake; it’s a full‑on edible experience that starts with a sizzling sound, a dark chocolate aroma that lingers, and a texture that feels like velvet on the tongue. The moment the first bite hits your palate, you’ll taste the deep, bittersweet cocoa, the buttery richness, and the subtle crunch of chocolate chips that whisper like a midnight wind. I dare you to taste this and not go back for seconds.
I’ve spent countless evenings experimenting with chocolate in every form—bars, truffles, ganache, and of course, cakes. Yet, every batch felt a bit “ordinary” until I added a twist that turned the whole thing into a show‑stopping monster. The secret? A blend of salted butter and light brown sugar that creates a caramelized crust, a generous splash of vanilla that balances the cocoa’s intensity, and a splash of gel food coloring that gives each monster a gleaming, otherworldly glow. Imagine a chocolate cake that looks as ominous as a haunted house, yet tastes like a cozy, dark chocolate hug. If you’ve ever struggled to get the texture just right, you’re not alone—and I’ve got the fix.
Most recipes get this completely wrong. They either over‑bake, resulting in a dry, crumbly monster, or under‑bake, leaving a gooey mess that looks like it’s about to collapse. The difference lies in the balance of fat, sugar, and chocolate, and in the precise timing of each step. Picture yourself pulling this out of the oven, the whole kitchen smelling incredible, and the cake’s surface glistening with a subtle sheen that catches the light like a midnight reflection. The first bite is a perfect marriage of creamy frosting, crisp edges, and a moist interior that melts in your mouth. This is hands down the best version you’ll ever make at home.
Let me walk you through every single step—by the end, you’ll wonder how you ever made it any other way. I’ll keep you side by side with a voice that’s confident, witty, and slightly opinionated, because this is more than a recipe; it’s a ritual. We’ll tackle the batter, the monster eyes, the frosting, and the final assembly, all while sprinkling in micro‑challenges that test your courage and taste buds. And trust me, if you’re ready for a Halloween treat that will make your guests scream for more, you’re in the right place.
What Makes This Version Stand Out
- Richness: The combination of salted butter and light brown sugar creates a caramelized flavor that cuts through the cocoa’s bitterness, delivering a depth that feels both decadent and comforting.
- Texture: The batter’s high fat content ensures a moist crumb that holds together, while the chocolate chips add a subtle crunch that mimics the eerie bite of a monster’s teeth.
- Visual Impact: Gel food coloring gives the cake a glossy, almost liquid surface that glows in dim lighting, turning every slice into a spooky centerpiece.
- Flavor Balance: Vanilla extract tempers the chocolate’s intensity, while the pinch of salt highlights every nuance of sweetness.
- Ease of Assembly: The frosting is whipped vanilla, which is quick to prepare and sets firm enough to hold the candy eyes in place, making the final decoration a breeze.
- Make‑Ahead Friendly: Once baked and frosted, the cake can be stored in the fridge for up to a week or frozen for later, ensuring you always have a monster on hand.
- Party Appeal: The 72 candy eyes add a playful, interactive element that invites guests to customize their own monster faces.
- Scalability: The recipe’s proportions are simple to adjust, allowing you to make a single slice or a full 9‑inch cake without compromising quality.
Inside the Ingredient List
The Flavor Base
Salted Butter: The 2.5 cups of salted butter are the backbone of this monster cake, providing a buttery richness that permeates every bite. The salt in the butter enhances the chocolate’s depth, making the flavor profile more complex. If you skip this step and use unsalted butter, the cake will taste flat and lack that savory edge.
Light Brown Sugar: The 5 cups of light brown sugar bring caramel notes that complement the chocolate’s bitterness. Brown sugar’s molasses content gives the batter a subtle acidity that balances sweetness. Replacing it with white sugar will result in a less robust flavor and a slightly drier crumb.
Eggs: The 8 large eggs act as both leavening agents and moisture carriers. They bind the batter, creating a smooth texture, and the proteins coagulate during baking to give structure. Skipping eggs will leave the cake crumbly and under‑baked.
The Texture Crew
Cocoa Powder: 1 1/4 cups of unsweetened cocoa powder give the cake its signature dark color and deep flavor. A higher cocoa content results in a richer, more intense chocolate experience. Using sweetened cocoa would make the cake overly sweet.
All Purpose Flour: 1.5 cups of flour provide the cake’s structure. A gluten‑free alternative could be a 1:1 blend of gluten‑free flour mix, but be mindful that the texture may slightly differ.
Chocolate Chips: Half a cup of semi‑sweet chocolate chips adds bursts of melty chocolate that contrast with the dense batter. If you prefer a smoother texture, replace them with finely chopped dark chocolate or omit them entirely.
The Unexpected Star
Gel Food Coloring: A splash of gel food coloring transforms the cake into a luminous monster. Gel colors are more intense and longer lasting than liquid dyes, preventing the cake from turning translucent. If you don’t have gel, a few drops of liquid food coloring will still work, but the effect will be less dramatic.
The Final Flourish
Whipped Vanilla Frosting: 8 ounces of whipped vanilla frosting provides a creamy, airy finish that balances the cake’s density. It also serves as a canvas for the candy eyes. If you prefer a richer frosting, add a tablespoon of butter to the mix.
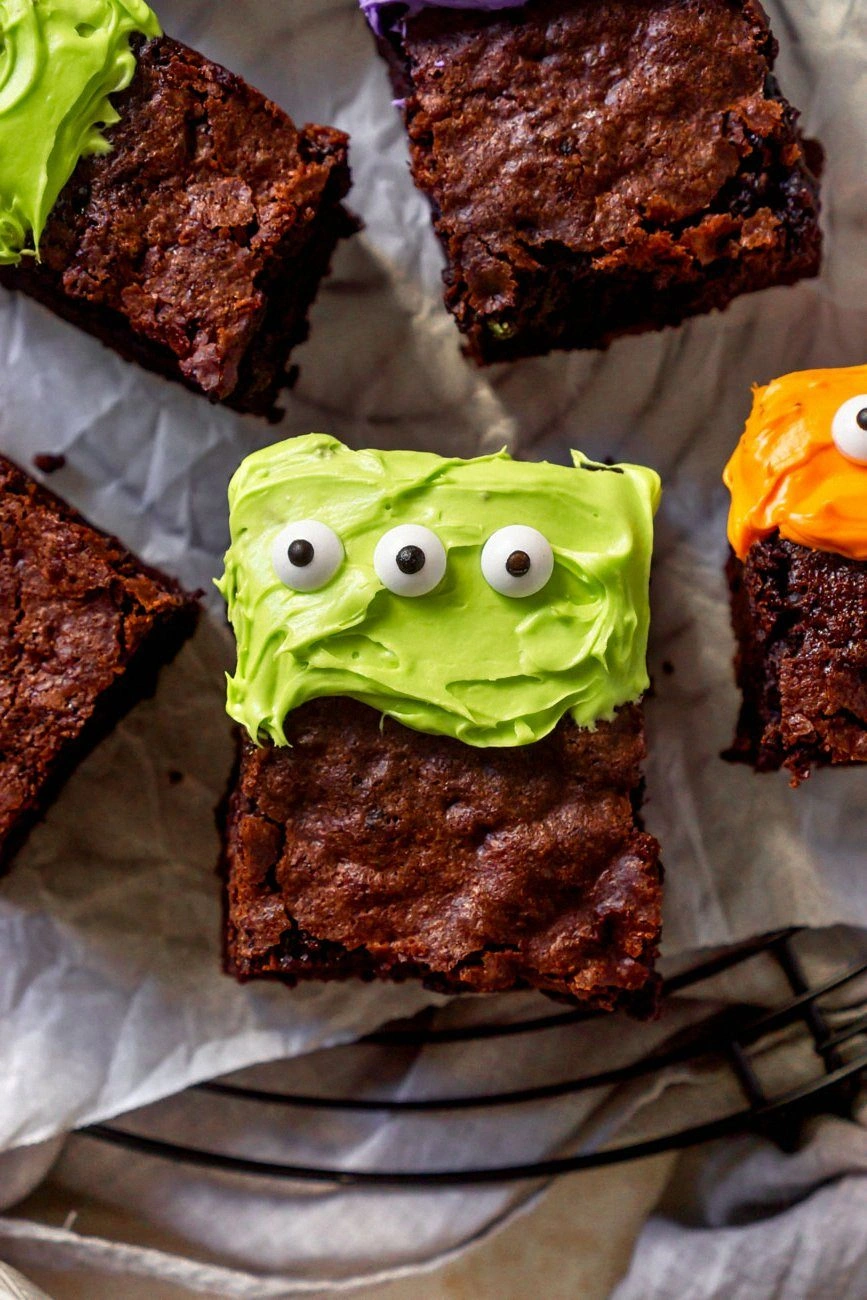
Candy Eyes: 72 candy eyes are the pièce de résistance, giving each slice a personalized, spooky face. They add a fun, interactive element that makes the dessert memorable. If you can’t find candy eyes, use small round candies or chocolate discs.
Everything's prepped? Good. Let's get into the real action.
The Method — Step by Step
- Heat your oven to 350°F (175°C). Line two 9‑inch round pans with parchment paper, then grease the paper lightly. This ensures the cake releases cleanly and maintains a smooth surface. Pre‑heat the oven while you prepare the batter so nothing gets cold.
- In a large saucepan, melt the salted butter over low heat until it’s just melted. Add the light brown sugar, whisking until the mixture is smooth and slightly caramelized. This step creates a rich base that infuses the cake with depth. Watch for a subtle golden hue.
- Remove the pan from heat and let the butter‑sugar mixture cool to room temperature. While it cools, whisk the eggs in a separate bowl until they’re light and frothy. The cooling step is crucial; hot eggs would scramble, ruining the batter’s texture.
- Gradually fold the cooled butter‑sugar mixture into the eggs, whisking constantly to create a smooth emulsion. This process ensures the batter is airy and well‑combined. It’s the foundation for the cake’s lightness.
- Sift together the cocoa powder, all purpose flour, and 1.5 teaspoons salt. Gently fold the dry ingredients into the wet mixture until just combined. Over‑mixing can develop gluten, resulting in a tough crumb. The batter should be glossy and pourable.
- Stir in the vanilla extract and chocolate chips, distributing them evenly. The chips will melt slightly during baking, creating pockets of gooey chocolate. This step adds texture and flavor bursts.
- Divide the batter evenly between the prepared pans. Tap each pan gently on the counter to release air bubbles. Bake for 30–35 minutes, or until a toothpick inserted into the center comes out clean. The cake should have a slightly firm edge that pulls away from the pan.
- While the cakes bake, prepare the whipped vanilla frosting. Beat 8 ounces of buttercream with a splash of milk until light and fluffy. Add a few drops of gel food coloring until you achieve the desired hue. This frosting will give the cake a glossy, monster‑like appearance.
- Once baked, let the cakes cool in the pans for 10 minutes, then transfer them to a wire rack to cool completely. This prevents the cake from becoming soggy at the bottom. A cool cake is essential for a firm frosting layer.
- Assemble the cake by placing one layer on a serving plate and spreading a generous layer of frosting. Top with the second layer, then cover the entire cake with a thin crumb coat. Chill for 20 minutes to set the crumb coat.
- Apply the final frosting layer, smoothing it with a spatula for a sleek finish. Use the remaining frosting to fill the spaces between the candy eyes. This step ensures the eyes stay in place and the cake looks polished.
- Arrange the 72 candy eyes on the frosting, spacing them evenly for a balanced look. Press each eye lightly to secure it. The eyes should look like they’re peering out from the cake, adding a playful yet spooky vibe.
- Chill the finished cake in the fridge for at least 30 minutes before serving. This helps the frosting set and makes slicing easier. When you cut into the cake, the frosting will stay intact, showcasing the monster faces.
That’s it — you did it. But hold on, I’ve got a few more tricks that will take this to another level.
Insider Tricks for Flawless Results
The Temperature Rule Nobody Follows
Many bakers assume room‑temperature butter is sufficient. In reality, using butter that’s slightly colder than room temperature (about 70°F) creates a lighter batter that rises better. I’ve seen cakes that were too dense because the butter was too warm and melted into the batter, preventing proper air pockets.
Why Your Nose Knows Best
When the cake starts to rise, it will emit a faint caramel scent. This is the cue that the batter has incorporated enough air and that the oven temperature is right. Trusting your nose saves you from over‑baking or under‑baking.
The 5‑Minute Rest That Changes Everything
After removing the cake from the oven, let it sit for 5 minutes on the rack before flipping it onto a cooling surface. This short rest allows the structure to set, reducing cracks and making it easier to remove from the pan. It’s a small step that pays off big.
The Frosting Trick for a Glossy Finish
Add a teaspoon of heavy cream to your whipped vanilla frosting and beat until glossy. The cream adds shine and makes the frosting less sticky, which is perfect for placing candy eyes. This trick is a game‑changer for a professional look.
The Eye Placement Blueprint
Use a toothpick to mark the positions of the candy eyes before you start decorating. This ensures an even spread and prevents clumping. It’s a simple layout that keeps your cake looking symmetrical.
Creative Twists and Variations
This recipe is a playground. Here are some of my favorite ways to switch things up:
Spiced Monster Cake
Add 1 teaspoon of ground cinnamon and 1/4 teaspoon of cayenne pepper to the dry mix. The warm spices add depth, while the pepper gives a subtle kick that complements the chocolate.
Nutty Creature
Fold in 1 cup of chopped walnuts or pecans before baking. The nuts add crunch and a buttery flavor that pairs wonderfully with the chocolate.
Minty Monster
Replace the vanilla extract with 1 teaspoon of peppermint extract and add a few drops of green food coloring. The mint provides a refreshing contrast to the rich chocolate.
Caramelized Monster
Swirl in a caramel sauce before baking. The caramel will melt into the batter, creating pockets of sweet, buttery flavor that enhance the chocolate.
Vegan Version
Use coconut butter instead of salted butter, plant‑based milk for the frosting, and a flaxseed egg (1 tablespoon flaxseed meal + 3 tablespoons water). The result is a cruelty‑free monster that still satisfies.
Mini Monster Bites
Bake the batter in a mini muffin tin for bite‑size monsters. They’re perfect for parties, and the candy eyes can be replaced with mini chocolate chips for a cute touch.
Storing and Bringing It Back to Life
Fridge Storage
Wrap the frosted cake tightly in plastic wrap and store it in the refrigerator for up to 7 days. The frosting will stay firm, and the cake will remain moist. Let it sit at room temperature for 20 minutes before serving to bring out the flavors.
Freezer Friendly
To freeze, wrap the cake in parchment paper, then in aluminum foil. It will keep for up to 3 months. Thaw overnight in the fridge, then bring to room temperature before serving. A quick 5‑minute bake in a pre‑heated 300°F oven will restore the cake’s warm, freshly‑baked feel.
Best Reheating Method
If the cake has been frozen, reheat it in a pre‑heated oven at 300°F for 10 minutes. Add a tiny splash of water to the bottom of the pan to create steam, which keeps the cake from drying out. Let it cool slightly before frosting to prevent the frosting from melting.