It was a Tuesday night that started like any other—late dinner, the fridge humming, and me staring at the empty shelf where I’d hoped to find a quick snack. I reached for the jar of honey, the only thing left that could turn a bland batch of dough into a sweet, sticky dream, and the kitchen erupted into a symphony of clinks and sighs. My last attempt at honey buns had turned the dough into a sticky mess that looked more like a science experiment gone wrong than a treat. I was about to give up when a neighbor’s voice crackled through the kitchen window, “You’ve got to try this version, it’s a game‑changer.” That dare, that promise of something better, is the spark that ignites this recipe.
Picture this: a golden crust that crackles as you slice through it, revealing a tender, honey‑infused crumb that clings to your fingers like a sweet, fragrant hug. The scent of warm honey and cinnamon swirls through the air, making your nose twitch in anticipation. When you bite, the first thing you taste is the buttery richness, followed by the subtle sweetness of honey, and then a gentle spice that lingers like a secret. The texture is a delicate balance—soft inside, crisp outside, with a hint of chewiness that feels like a cozy blanket for your mouth. That’s the sensory snapshot I’m about to share with you, and it’s going to change how you think about breakfast buns forever.
What sets this version apart isn’t just the honey; it’s the precision of every ingredient, the timing of the rise, and the final glaze that coats each bun like a golden ribbon. I’ve spent hours tweaking the ratio of flour to liquid, experimenting with the type of yeast, and testing different honey brands until I found the perfect harmony. The result? A bun that rises beautifully, holds its shape, and offers a burst of flavor that lingers long after you’ve finished. If you’ve ever struggled to get your buns to rise or ended up with a dough that’s too sticky or dry, this recipe is your new holy grail.
Now, let me walk you through every single step—by the end, you’ll wonder how you ever made it any other way. I dare you to taste these and not go back for seconds, because this is hands down the best version you’ll ever make at home. And if you’re still skeptical, stay with me; the next few minutes will prove that this recipe is nothing short of a revelation.
What Makes This Version Stand Out
- Flavor: The combination of honey and cinnamon creates a depth of sweetness that is both comforting and sophisticated, far beyond the plain sugar glaze of ordinary buns.
- Texture: A perfectly aerated crumb that remains moist inside while the exterior turns a crisp, caramelized golden brown—think of a warm hug that cracks like thin ice.
- Ease: The method is streamlined; no need for a stand mixer or a dough hook. All you need is a bowl, a whisk, and a dash of patience.
- Ingredient Quality: Using real honey, butter, and fresh flour elevates the flavor profile, making every bite a testament to quality.
- Crowd Appeal: These buns are a hit at gatherings, turning a simple breakfast into a showstopper that keeps guests talking.
- Make‑Ahead Potential: The dough can be refrigerated overnight, and the buns can be baked fresh in the morning, saving you precious time.
- Versatility: Swap in dried fruit, nuts, or even chocolate chips to tailor the buns to any occasion or taste preference.
- Nutrition: While indulgent, the buns are balanced with protein from eggs and dairy, making them a satisfying start to your day.
Alright, let's break down exactly what goes into this masterpiece...
Inside the Ingredient List
The Flour Foundation
All-purpose flour is the backbone of our buns. It provides the structure needed for the dough to rise and hold its shape. Using a higher protein flour can make the buns chewier, so if you prefer a lighter bite, stick with all-purpose. Skipping flour would turn the dough into a sticky mess that won’t hold together.
The Liquid Harmony
Warm milk activates the yeast and creates a moist environment for the dough to expand. The temperature should be around 110°F; too hot and you’ll kill the yeast, too cold and it won’t activate. If you’re lactose intolerant, swap the milk for oat milk or a blend of almond milk and a splash of soy milk to keep the flavor profile intact.
The Sweetener and the Stickiness
Honey is more than a sweetener; it’s a natural humectant that keeps the buns moist and gives them a subtle floral note. A light or amber honey works best; dark honey can dominate the flavor. If you’re watching your sugar intake, a drizzle of maple syrup can replace honey, but the buns will have a slightly different character.
The Fat Factor
Butter adds richness and contributes to a tender crumb. Melt it gently to avoid separating. If you’re vegan, coconut oil can substitute, but the flavor will shift toward a tropical note.
The Yeast and the Rise
Active dry yeast is the engine that drives the dough’s expansion. Dissolve it in warm water with a pinch of sugar to kickstart the fermentation. If you’re using instant yeast, you can skip the proofing step; just mix it directly into the dry ingredients.
The Egg and the Binding
Eggs bind the ingredients together and provide structure. They also contribute to browning through the Maillard reaction, giving the buns that desirable golden crust. A single egg is sufficient for four servings; adding a second egg will make the buns denser.
The Spice and the Aroma
Ground cinnamon adds warmth and depth. It pairs perfectly with honey, creating a flavor profile reminiscent of holiday mornings. If you’re a cinnamon lover, double the amount for an extra kick.
Optional Add‑Ons
Walnuts, raisins, and shredded coconut add texture and flavor diversity. They also provide healthy fats and fiber. Feel free to experiment: chopped pecans, dried cranberries, or even chocolate chips can transform the buns into a dessert.
Everything's prepped? Good. Let's get into the real action...
The Method — Step by Step
- Activate the Yeast: In a small bowl, combine 2 1/4 teaspoons of active dry yeast with 1 tablespoon of warm water (110°F) and a pinch of sugar. Stir gently and let sit for 5–7 minutes until frothy. This froth is the sign that the yeast is alive and ready to power the dough. If it doesn’t froth, you’ve likely got dead yeast—start over with fresh yeast. This is the moment of truth; the dough’s destiny hinges on this small step.
- Mix Dry Ingredients: In a large mixing bowl, whisk together 2 cups of all-purpose flour, 1 teaspoon of salt, 1 teaspoon of ground cinnamon, and 1 tablespoon of sugar. The dry mix ensures even distribution of flavor and prevents clumping. The salt balances the sweetness, while the cinnamon adds warmth. This step is simple but crucial for a consistent crumb.
- Combine Wet Ingredients: In another bowl, whisk 1 cup of warm milk, 1/4 cup of honey, 2 tablespoons of melted butter, 1 egg, and 1 teaspoon of vanilla extract until well blended. The wet mix should be smooth and slightly glossy. The honey and butter will later lend moisture and richness, while the egg provides structure. Keep this mixture warm; if it cools, the yeast activity may slow.
- Form the Dough: Pour the wet mixture into the dry ingredients and stir with a wooden spoon until a shaggy dough forms. Then add the activated yeast mixture and mix again until the dough starts to pull away from the sides of the bowl. The dough should be slightly tacky but manageable. At this point, you can add optional add‑ons: 1/4 cup walnuts, 1/4 cup raisins, or 1/2 cup shredded coconut. They’ll be distributed evenly through the dough.
- Knead the Dough: Turn the dough onto a lightly floured surface and knead for about 8–10 minutes until it becomes smooth and elastic. The dough should pass the “windowpane test” where a small piece stretches thin without tearing. If it sticks, sprinkle a little more flour; if it’s too dry, add a splash of warm milk. Kneading develops gluten, which gives the buns their structure.
- First Rise: Place the dough in a greased bowl, cover with a damp cloth or plastic wrap, and let rise in a warm spot for 1–1.5 hours, or until doubled in size. The dough should feel airy and slightly puffy. This rise is where the yeast ferments sugars, producing carbon dioxide that lifts the dough. Patience is key; rushing this step will result in dense buns.
- Shape the Buns: Punch down the dough to release excess gas, then divide it into 8 equal portions. Roll each portion into a smooth ball and place them on a parchment‑lined baking sheet, spacing them about 2 inches apart. The spacing allows the buns to expand without sticking together. This is the fun part—watch how the dough transforms into individual, ready‑to‑bake masterpieces.
- Second Rise: Cover the shaped buns loosely with a clean kitchen towel and let rise for an additional 30–45 minutes. The buns should rise just enough to look like small, soft domes. This second proof ensures a light, airy interior. Keep an eye on them; overproofing will cause them to collapse.
- Preheat the Oven: While the buns finish their second rise, preheat your oven to 375°F (190°C). An even oven temperature guarantees a uniform crust. If you’re using a convection setting, reduce the temperature by 25°F to avoid over‑browning.
- Bake: Place the baking sheet in the preheated oven and bake for 18–22 minutes, or until the tops are golden brown and the buns sound hollow when tapped on the bottom. The internal temperature should reach 190°F. This is the moment of truth; the aroma will fill your kitchen like a warm hug.
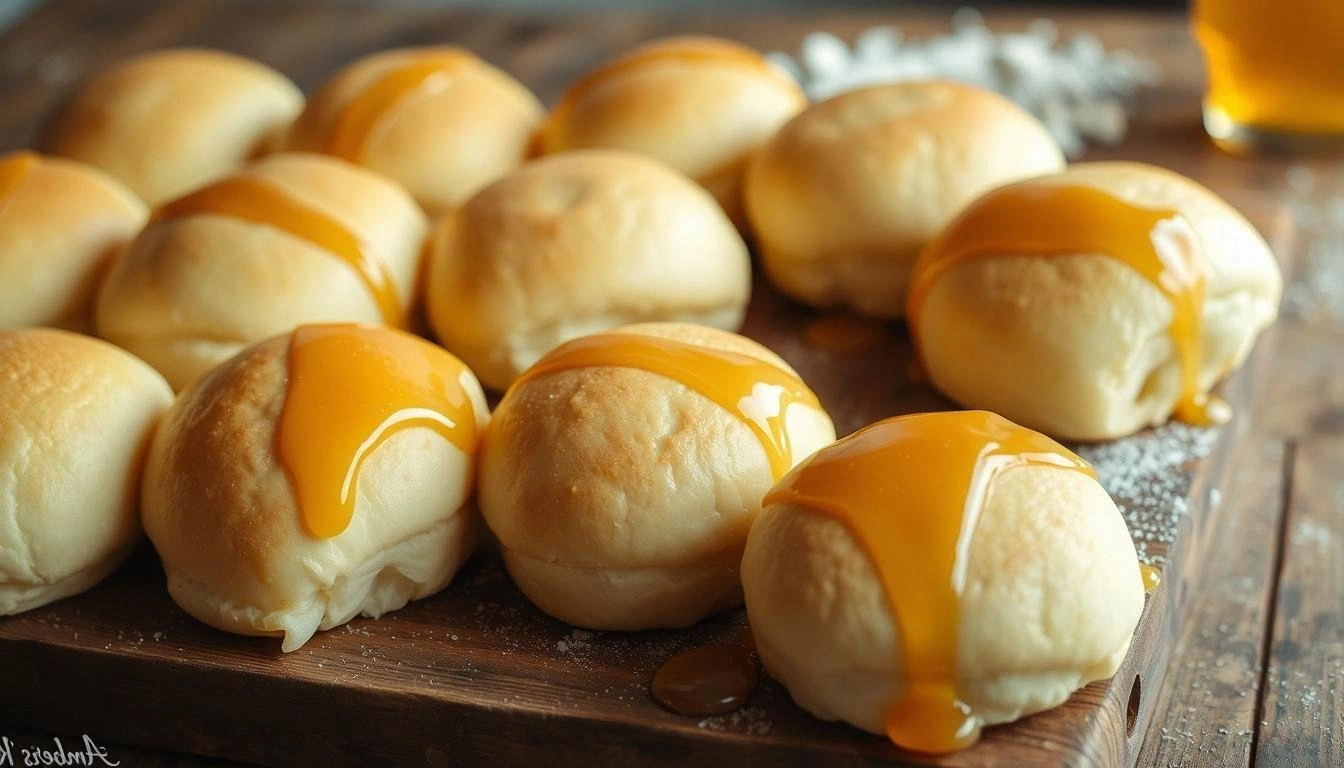
- Glaze: While the buns are still hot, whisk together 1/4 cup honey and 2 tablespoons of melted butter. Brush the glaze over the tops of the buns with a pastry brush. The glaze will caramelize slightly, creating a glossy, sweet finish. Let the buns cool on a wire rack for 10 minutes before serving.
That's it — you did it. But hold on, I've got a few more tricks that'll take this to another level...
Insider Tricks for Flawless Results
The Temperature Rule Nobody Follows
The oven temperature is often underestimated. A 375°F oven is ideal, but if your oven runs hot, preheat it for 15 minutes and use a lower temperature of 350°F. This ensures a golden crust without burning the tops. I’ve found that using a baking stone also helps distribute heat evenly, giving the buns a consistent rise.
Why Your Nose Knows Best
Smell is a powerful indicator of doneness. When the buns start to emit a buttery, honey aroma, they’re almost ready. If you’re unsure, press the top lightly; it should feel firm yet spring back. Trust your nose—if it smells like toasted sugar, you’re in the right zone.
The 5-Minute Rest That Changes Everything
After removing the buns from the oven, let them rest on the rack for 5 minutes before glazing. This brief pause allows the steam to settle, preventing the glaze from sliding off. I’ve learned that glazing immediately after baking can cause the glaze to run, ruining the glossy finish.
The Secret to a Crispy Crust
Sprinkling a little coarse sea salt over the buns before glazing creates a subtle crunch that contrasts the soft interior. The salt also enhances the sweetness, making each bite a balanced flavor explosion. It’s a simple addition that elevates the whole experience.
The Quick Chill Trick
If you’re making the buns ahead of time, chill them in the refrigerator for up to 24 hours before baking. This slows yeast activity, giving you more control over the rise. When you’re ready to bake, let the buns sit at room temperature for 30 minutes to warm up slightly. The result is a perfectly baked bun every time.
The Finish Line
Once glazed, let the buns cool completely before slicing. Cutting them too early can cause the glaze to crack. I’ve had the best results when letting them set for 10 minutes, allowing the glaze to firm up into a glossy sheen.
Creative Twists and Variations
This recipe is a playground. Here are some of my favorite ways to switch things up:
Chocolate Chip Honey Buns
Fold in 1/2 cup dark chocolate chips into the dough before shaping. The chocolate adds a rich, bittersweet note that pairs wonderfully with honey. Serve with a dusting of powdered sugar for an extra touch of elegance.
Pecan Caramel Honey Buns
Replace walnuts with chopped pecans and drizzle a caramel sauce over the glaze. The caramel adds depth and a buttery sweetness that complements the honey. The pecans also provide a satisfying crunch.
Citrus‑Infused Honey Buns
Add the zest of one orange and one lemon to the wet mixture. The citrus brightens the flavor, creating a refreshing contrast to the honey. This variation is perfect for brunch or a light dessert.
Spiced Pumpkin Honey Buns
Stir in 1/4 cup pumpkin puree and 1 teaspoon pumpkin pie spice into the dough. The pumpkin adds moisture and a subtle sweetness, while the spice blend gives the buns a warm, autumnal feel. This is a seasonal favorite for fall gatherings.
Nutella‑Swirled Honey Buns
Spread a thin layer of Nutella between two dough balls before sealing them together. The chocolate hazelnut spread creates a decadent swirl that melts into the buns as they bake. The result is a sweet, indulgent treat that satisfies chocolate cravings.
Gluten‑Free Honey Buns
Swap the all-purpose flour for a gluten‑free blend (such as a 1:1 rice‑based mix). Use a gluten‑free yeast blend if available. The texture will be slightly denser, but the flavor remains delightful. This version is great for those with dietary restrictions.
Storing and Bringing It Back to Life
Fridge Storage
Store baked buns in an airtight container at room temperature for up to 3 days. If you need to keep them longer, refrigerate them for up to 5 days. The buns will stay moist and flavorful when wrapped tightly.
Freezer Friendly
Wrap each bun individually in plastic wrap and place them in a freezer bag. Freeze for up to 2 months. To thaw, leave at room temperature for 1 hour, then warm in a 300°F oven for 5 minutes. The buns will regain their softness and taste fresh.
Best Reheating Method
Add a tiny splash of water (about 1 teaspoon) to the bottom of a baking dish, cover with foil, and heat at 350°F for 10 minutes. The steam will restore moisture and give the buns a fresh, warm feel. Finish with a quick brush of glaze to re‑introduce that glossy finish.